How to Remove Shadow from Photo:
Best Ways in 2025


Couldn’t avoid shadows when shooting and don’t know how to cut them out? You’ve clicked the right link! Our team has tested top 5 shadow cleaners that will help you fix it in post-production. In this article, you’ll discover everything you need to know about how to edit shadows out of pictures - scroll down to find brief app descriptions, editing steps, and pros and cons of each program. But you’re probably wondering if it’s possible to take shadow-free photos and the answer is yes - there are a couple of useful tricks you could try and we’ll also share them in this post.
Pick a suitable program from our list and remove shadows with no hassle
Want to erase shadows in no time?
Hit the button below and get it done with the user-friendly PhotoWorks:
Part 1: Remove shadows on your PC
Part 2: Get rid of shadows in mobile apps
Part 3: Fix shadows with online shadow removers
Part 4: Edit out shadows in Photoshop
Part 5: Erase shadows on faces
Part 6: Avoid shadows when taking pictures
Part 1: Remove Shadows with PhotoWorks
For starters, we’ll show you how to delete shadows in PhotoWorks as it suits both amateur and seasoned photographers. This powerful software with a bunch of AI features will let you erase objects, replace the background, remove skin blemishes, and even edit multiple photos in just a couple of clicks. So why not use it to fix shadows as well? Here are a few ways to remove them with professional precision and simplicity in PhotoWorks.
1. How to Erase a Simple Shadow
There’s a range of tools you can use to edit out unwanted objects, but for shadows on a solid surface or background, we recommend going for the Healing Brush tool. Follow the steps below to get rid of simple shadows in your photographs.
Step 1. Install PhotoWorks on your PC
It’ll be better if you have the program at your disposal and follow the steps right after reading the guide. So hit the button to install PhotoWorks on your computer.
Step 2. Pick the Healing Brush Tool
Once you launch the program and upload the picture you’re going to edit, go to the Retouch tab, and click on Healing Brush.
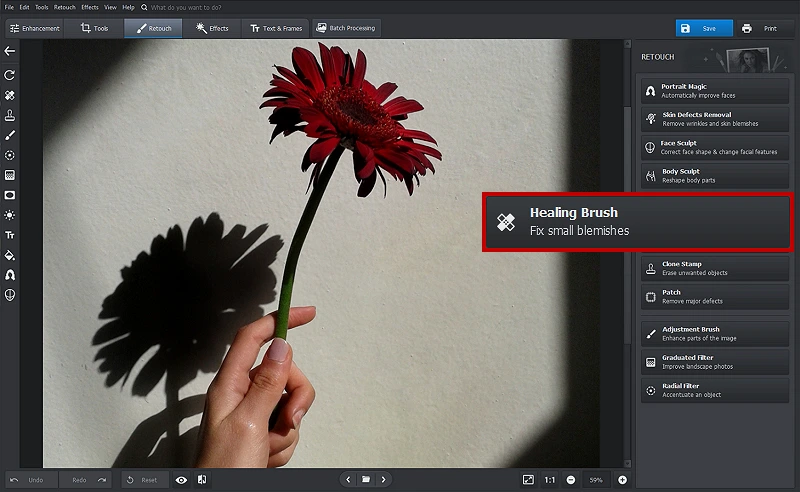
There’s a shadow on the wall so let’s fix it
Step 3. Remove the Shadow from Your Photo
Move the sliders to set the size of the brush and paint over the shadow. The program will copy the texture of the area near the selection, so the result will look natural.
For a realistic effect, make sure to set the amount of feather and opacity. Feather will soften and blur the edges of the selection, and opacity will determine how transparent the selected area will look. Just drag the sliders to the right or left to adjust the settings.
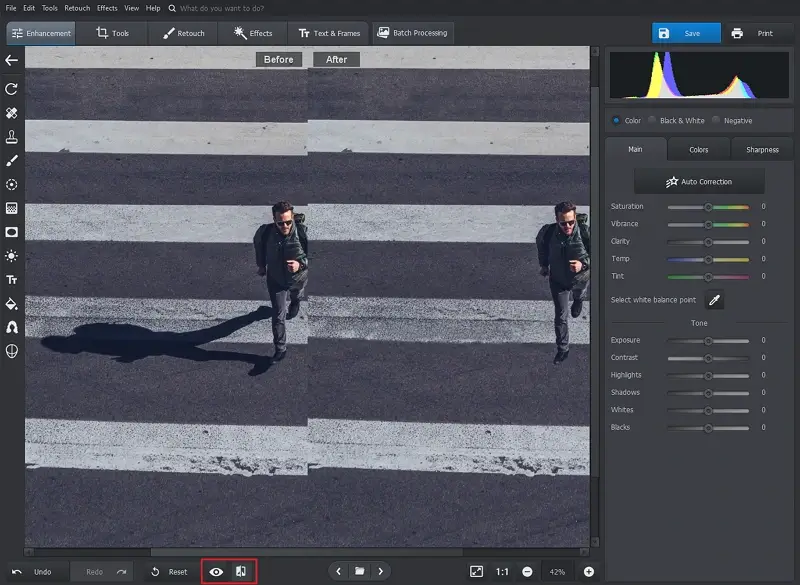
Is the shadow gone? Then let’s compare the output with the original photo - click the Before / After icon or press and hold the Show Original button to see the changes.
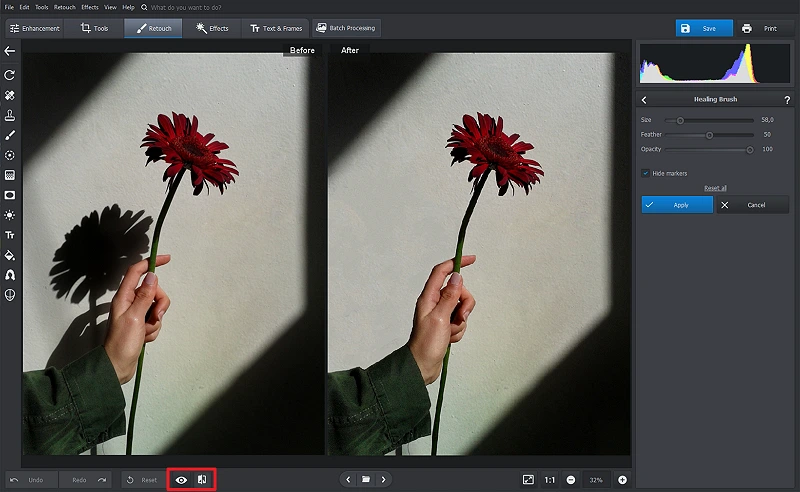
The removal is totally seamless
Step 4. Save the Photograph
Are you happy with the results? It’s time to save the image - press the blue button in the top-right corner to save the picture in one of the popular formats like JPEG or PNG. If you need to change the resolution, switch to the File menu and select Resize and Save.
2. How to Accurately Remove an Oddly-Shaped Shadow
In some cases, you’ll need more precise tools like the Clone Stamp. Let’s see how to use this object erasing tool for more challenging tasks.
Step 1. Choose the Clone Stamp
Add your picture and select the Clone Stamp tool in the Retouch tab.
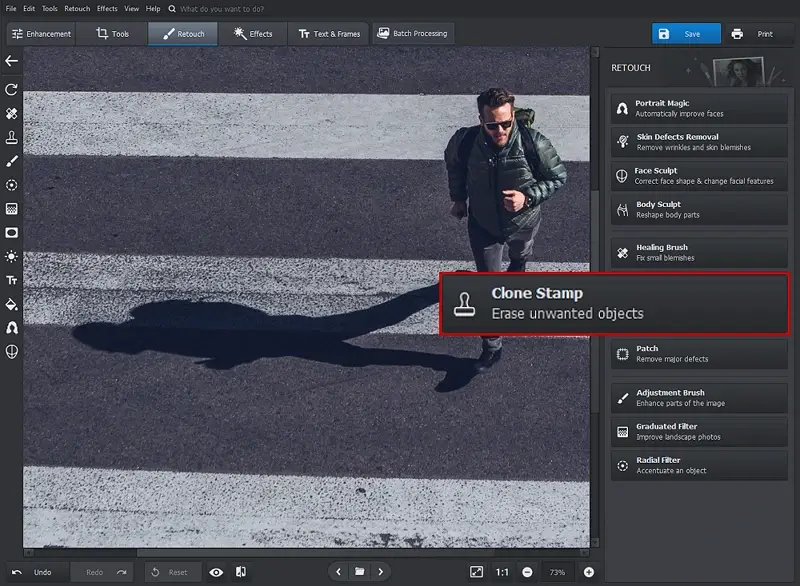
Pick this tool to erase the shadow on the road
Step 2. Erase the Shadow
Zoom in by holding the Ctrl key and scrolling the mouse wheel up. In the right panel, adjust the brush size, select a segment of the shadow, and drag it to another part of the image. Now the program will replace the selection with the area you chose. For precise removal, we recommend you delete shadows in small parts.

Copy and paste small parts of the photo
Step 3. Export the Edited Image
Finally, click on the Before / After button to compare the original picture with the fixed one and save it - open the Resize and Save settings or simply hit the Save button to export the photo in the file format you need, e.g., PNG, JPEG, BMP, or TIFF.
Now the shadow is concealed with another segment
To remove larger shadows, use the Patch tool - you can select the whole shadow at once instead of editing parts little by little. It also offers more flexibility and accuracy than the Clone Stamp tool since it only copies segments while the Patch tool smoothly blends in the selection.
Would you rather watch a YouTube video than read a step-by-step guide? Then play this video tutorial to see how shadow removal works in practice.
Wasn’t it a piece of cake? Press the button below to try these simple methods yourself.
If the described ways don’t suit you well or you’d like to experiment with more photo editing programs, then let’s move on to the next part - we’ll begin with mobile applications.
Part 2: Best Shadow Remover Apps
Are you used to doing everything on the go? Then why don’t you edit photos on a smartphone as well! Here are a few options to try - you can find the programs in the App Store and Google Play.
Photoshop FixSnapseed
Picsart
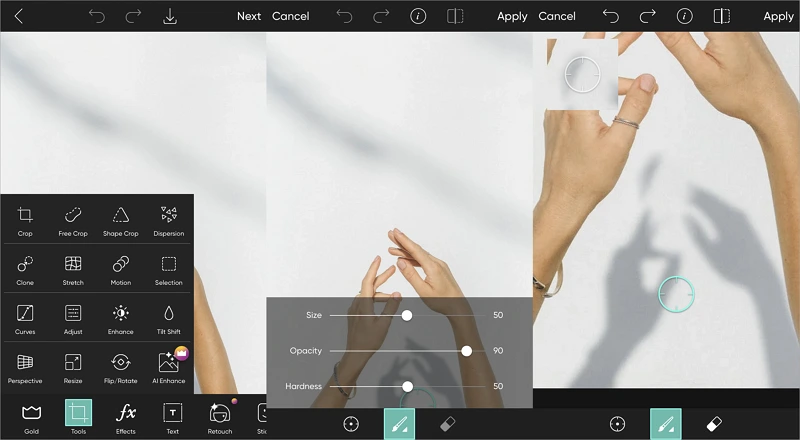
Photoshop Fix
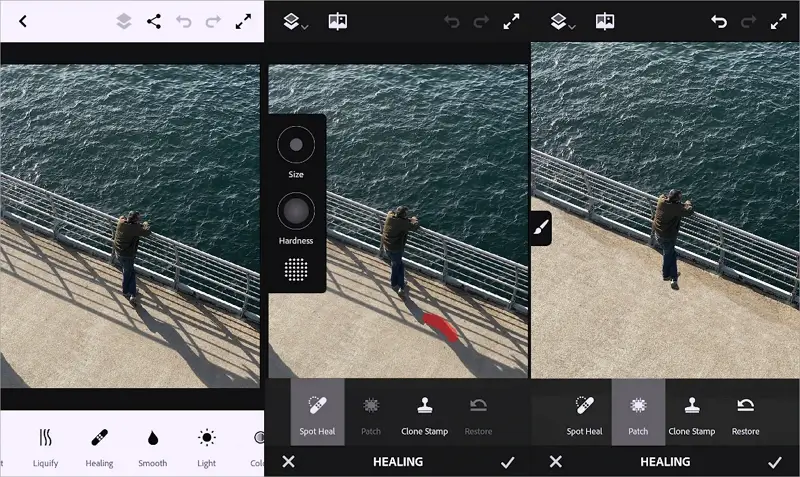
Erase the shadow with Spot Heal and use Patch or Clone Stamp to fix the missteps
Photoshop Fix is a mobile photo editor by Adobe that is available for Android devices. Even though other Adobe products are notoriously complicated, this handy app is very easy to use. Photoshop Fix allows you to edit something out of a picture using three tools from the Healing section.
- The Spot Heal tool helps to erase the area you select with the adjustable brush - you can change the size and hardness of the tool.
- Use the Patch tool to remove any parts of the shadow that remained in the image.
- Pick the Clone Stamp to replace a dark area with another.
Snapseed
Paint over the dark area to remove it
Snapseed is a user-friendly photo editor compatible with both Android and iOS devices. It offers most of the basic features you’d need to edit an image - cropping, overlaying, overall enhancement and more. If you like the minimalist style and the toolkit of Snapseed, remove shadows from a photo in the app with the following tools.
- Select the Healing tool, paint over the shadow, and tap the tick to save the changes.
- Choose the Brush tool, tap the brush icon, and select Exposure. Now lighten the shadowy area and tap the tick icon to save the result.
Picsart
Replace the shadow with a white area from your picture
Picsart, a shadow remover app for iOS- and Android-based smartphones, also has a lot of features to try - adding captions, creating collages, deleting the background, etc. Here’s how to remove shadows from pictures in Picsart.
- Switch to the Tools menu and select the Clone tool. Tap the brush icon to change the size, opacity, and hardness. Drag the selection point to remove the shadow from the white background. If you accidentally erase other parts, use the adjustable eraser.
Part 3: Best Online Shadow Removers
There are lots of reasons to try online photo editors, but most importantly they’re free and very easy to use. They will suit you perfectly in case you need a program for just one task. However, web-based tools won’t handle sophisticated and skill-demanding photo editing - for pro-level replacement, take a look at this method. But if you’re dealing with simple photos, check out the top online shadow removers we gathered for you.
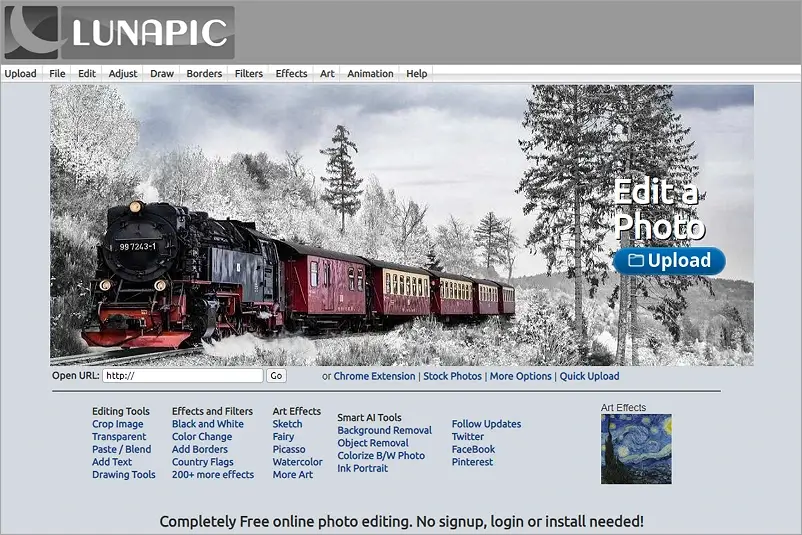
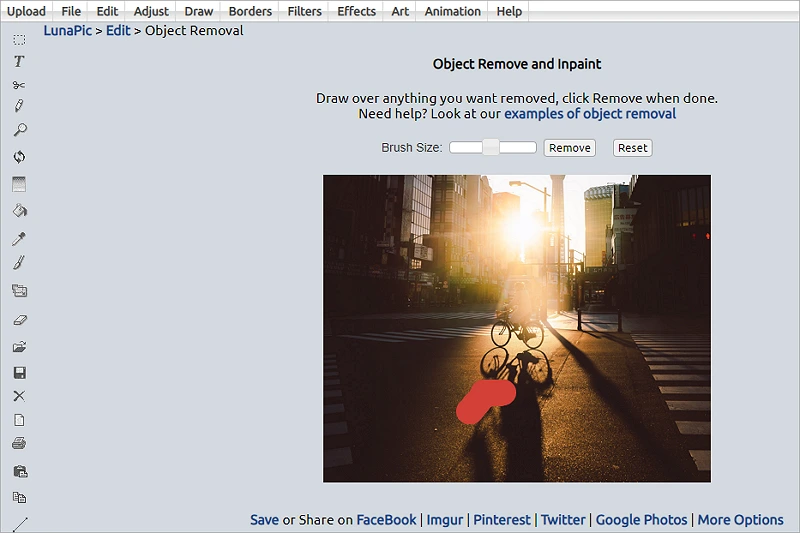
LunaPic
LunaPic is a free browser-based photo editor with most of the common features such as resizing, cropping, background removal, filters, and so on. Besides, you don’t need an account to use the service.
Here’s how to get rid of shadows in pictures with LunaPic: upload a file or use URL, go to the Edit menu, and select Smart Object Removal. Now all you have to do is adjust the Brush Size, paint over the shadow, and press the Remove button.

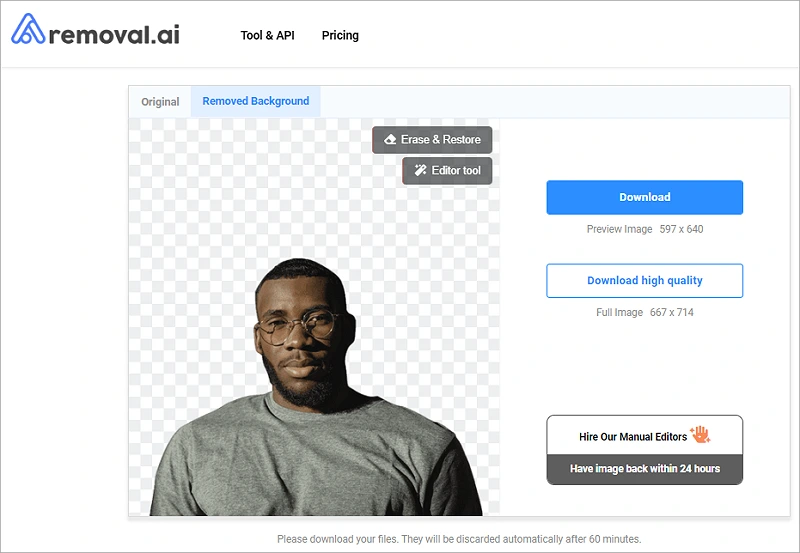
removal.ai
removal.ai is also a background remover that you can either install on your computer or use online. This tool will come in handy in case there’s a dark background area you’d like to erase or replace with another. However, in the free version, you can’t save photos in the original high resolution.
But if this sounds like the app you need, then open the website, import the photo, wait till it deletes the shadowy background, and download the edited image.
Part 4: How to Remove Shadows in Photoshop
There are cases that are way too challenging, so only the giants of the photo editing industry can handle them. This is where Adobe Photoshop comes to rescue. To fix shadows in this program, you’ll need to purchase the subscription that many users find rather costly. But if it’s more than a hobby for you, and you’re ready to go through a long process of trial and error, then keep reading to learn how to remove a shadow in Photoshop.
- Add the picture. Once you launch the program, click File, and select Open to choose a file.
- Open Camera Raw Filter. In the Filter dropdown menu, select Camera Raw Filter.
- Select the dark area. Now you need to pick the Adjustment Brush, check the Show Mask and Auto Mask boxes in the right panel, and paint over the shadow.
- Edit the shadowy area. Turn off the mask to see the changes you make. Move the sliders to correct shadows in the photo - adjust such settings as Exposure, Brightness, Temperature, Saturation, and so on.
- Fix the edges. Now the selection edges might stand out and look unnatural, so let’s correct them as well - use the Spot Healing Brush to paint over the lines.
- Export the edited image. To save the picture, click File, select Save As, choose the destination folder and format, and set the quality of the photo.
Use Adobe Photoshop for challenging tasks
Part 5: How to Fix Shadows on Faces
In case you mainly deal with portraits, the methods we described above might not work well for you. Instead, we recommend you use a couple of common face retouching tools. In PhotoWorks, they are extremely easy to use, so let’s see how to fix shadows on faces in this software.
Lighten Faces in Seconds with AI-Run Portrait Magic
Let’s begin with a simple way to remove a shadow from a photo - just follow these steps and you’ll retouch a portrait in a moment. Download PhotoWorks, launch the program, and import your photo. Then open the Retouch tab and select Portrait Magic to choose one of ready-to-use enhancement options such as Lighten face or Add slight shine - you don’t have to select anything on the image since the program identifies facial features all by itself. Finally, drag the slider to adjust the amount of the applied effect, click Apply, and save the edited picture.
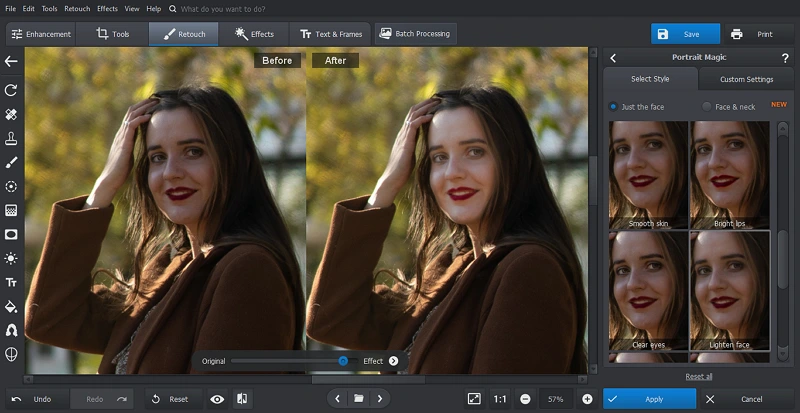
Try auto face retouching tools to fix shadows in portraits or selfies
Advanced Portrait Retouching
Sometimes shadows only cover a part of the model’s face or several areas. To eliminate shadows locally, be sure to try the Adjustment Brush. All you’ll need to do is paint over the shadows and use the sliders to modify your photo - increase the shadows and set the amount of Exposure around 15.
We also recommend lightening dark areas by increasing the whites, but this setting should be used only to adjust the dark spots - the light areas might become unnaturally bright or blank white. This method may take you a little bit more time, but it’s pretty much fun, so play with the sliders and the final result will look fascinating.
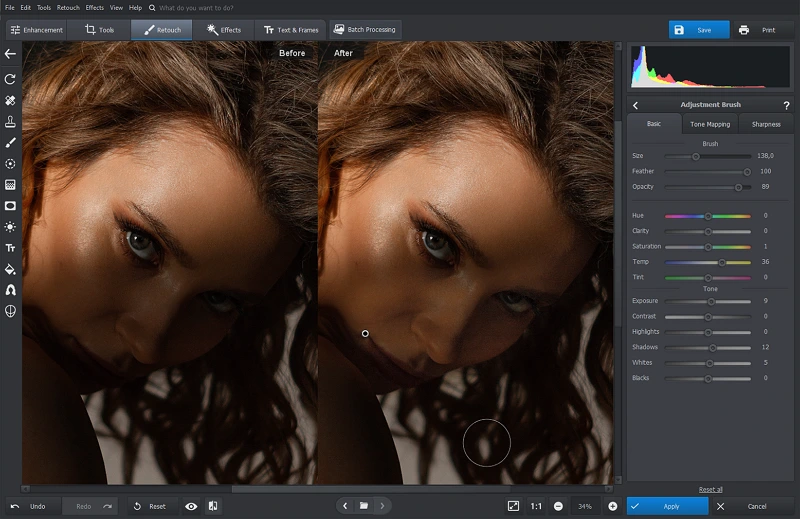
Pick the Adjustment Brush for more sophisticated shadow removal
Part 6: Tips on How to Avoid Shadows When Taking Pictures
Why waste time on editing things out in the first place if you could simply learn how to avoid shadows in photography and never deal with this problem again? Believe us, it’s possible. Here are some tips that will help you with it - be sure to try them next time you shoot.
Consider the Time of the Day
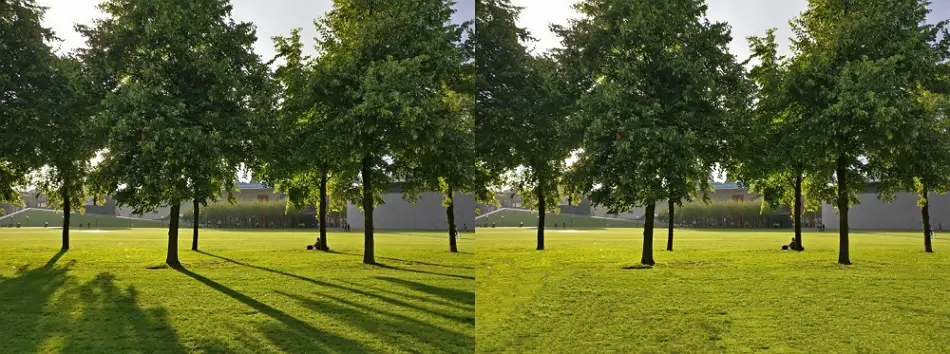
There’s no such thing as right or wrong time for a photo shoot, but pictures will look completely different early in the morning or in the afternoon. We don’t recommend taking photos when the sun is high - the light will be harsh and there’ll be dark shadows in your shots. For softer lighting, shoot in the golden hour or during the sunset.
Turn the Flashlight On
If you want to take a photo indoors, then it’s a good idea to use the flash - almost any camera and phone has it. However, it might cause shadows when shooting outdoors, so you’ll have to find a better angle. To do so, take a few shots and see which looks better.
Mind the Lighting Setup
There are lots of tricks you could use in a studio to take photos without shadows. For example, you can move the model away from the backdrop to avoid a shadowed wall effect. But in this kind of photography, it’s also important to know at least the basic lighting setups to either create a certain effect with shadows or simply avoid them when shooting.
Conclusion
As you can see, removing shadows might be challenging but it’s still a manageable task even for total beginners. In this article, we talked about how to take a picture without a shadow and showed several photo editors that will help you delete shadows in the photos already taken. Now you know the best computer programs for pro-level editing, mobile apps for quick removal, and even browser-based services. But what if you're only about to take up photography and don’t know where to start? Then make sure to try the beginner-friendly PhotoWorks first - it won’t leave you disappointed.
Get Rid of Other Common Photography Problems:
Use PhotoWorks to remove them in a jiff