How to Fix Blurry Pictures:
Best Ways to Sharpen Images in Different Apps

Whether photography is your job or hobby, it’s always good to know how to clear up a photo that is blurry - we often need to quickly snap a picture but in some cases the camera misses the focal point and we end up deleting the unlucky shot. Sure, you could simply adjust the camera focus before pressing the button, but what if you already took a photo? Don’t worry - with the right tool, you can effortlessly fix a blurry picture even if you’ve never done it before.


Fix blurry pictures in a moment
Want to sharpen blurry photos in a couple of clicks?
Hit the button below and fix pictures with the handy PhotoWorks:
But it could take you days to test all the popular programs for fixing blurry pics. Luckily, we did the tedious work for you and now we’ll introduce the most efficient and user-friendly photo editors in this article. You’ll discover the top computer programs, online services, and mobile apps for enhancing photos. So what are we waiting for? Let’s jump right in and find out how to edit a blurry picture!
Part 1: How to Fix Blurry Pictures on PC
Part 2: How to Fix Blurry Pictures on Mac
Part 3: How to Fix Blurry Pictures Online
Part 4: How to Use Best Mobile Apps to Unblur Photos
Part 5: How to Avoid Blurry Images: Photo Sharpening Tips
Part 1: How to Fix Blurry Pictures on PC
Let’s begin with a photo editor that works on Windows. For the current task, PhotoWorks will be a great choice. The uncluttered interface, convenient tools, and built-in hints make the program truly beginner-friendly. In PhotoWorks, you can easily make a picture less blurry and do overall photo enhancement with the help of other features - change the background, color correct the image, fix the composition, apply filters, and more. Now let’s download PhotoWorks and try three simple ways to deblur a picture.
Need to sharpen your photos?
Use PhotoWorks to do it in a couple of clicks!
Way 1. Using the Sharpness Tool
In most cases, the Sharpness tool will be enough to make pictures clearer. If you try this method first, you might not even need any other tools for this task. Here’s how it works:
- Increase the amount of sharpness. Open the Enhancement tab and click on the Sharpness tab. Drag the slider to the right to adjust the Sharpening setting.
- Adjust the Radius setting. Increase the Radius degree to change the amount of pixels you want to clarify around the edges.
- Change the threshold. This setting defines the contrast between the pixels, so it also helps to remove the blur. But if it’s adjusted incorrectly, the picture might turn out too harsh. We recommend increasing the level of Threshold up to 3-10.
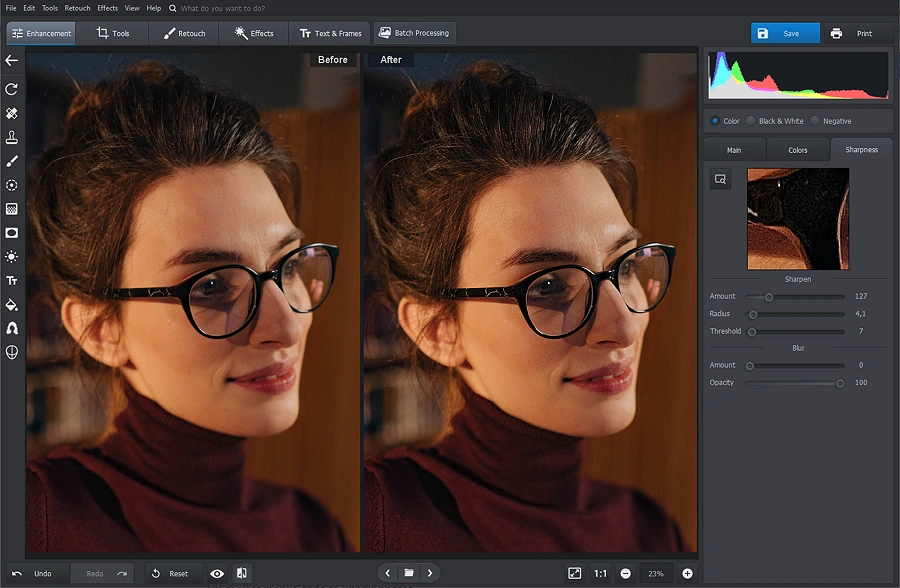
Check the changes in the preview box
Way 2. Using the Clarity Tool
Another effective way to make blurry pictures clear is to change the Clarity setting - you’ll enhance the overall picture quality by adjusting the level of midtone contrast.
- Open your picture. Launch the photo editor, upload an image and stay in the Enhancement tab.
- Set the Clarity amount. To add sharpness, move the slider to the right. But it might look overdone if you set the Clarity value too high - 60-80 should be enough in most cases.
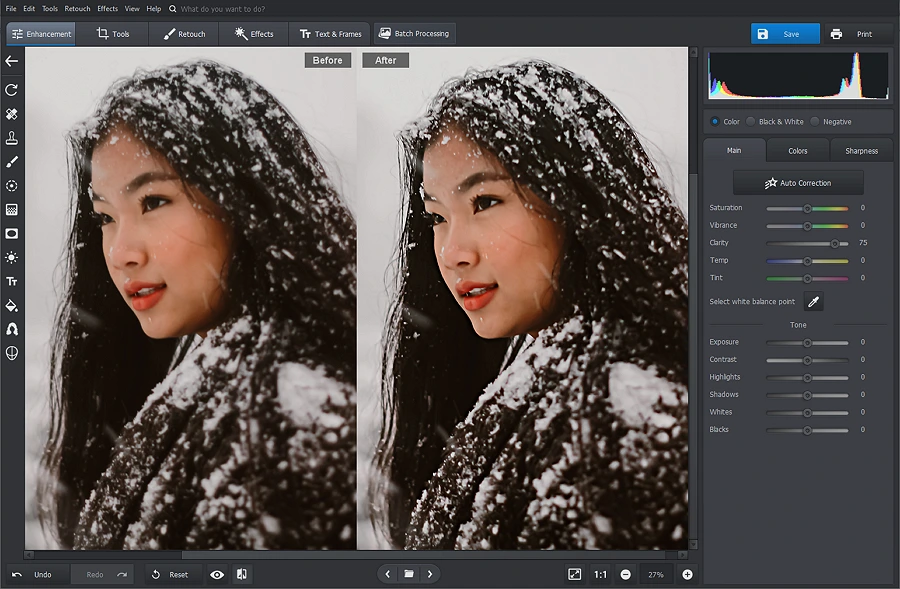
Make sure the sharpened image looks natural
Way 3. Using the Radial or Graduated Filter
If you want to fix a particular part of your picture, Radial and Graduated Filters will work better for you. With the oval-shaped Radial Filter, you can sharpen almost any kind of photo, while the Graduated Filter is more suitable for clearing up landscape photographs.
- Select a filter. Switch to the Retouch tab and either select the Radial or the Graduated filter.
- Place the filter onto the image. Make a vertical or horizontal selection with the Graduated filter. In case you picked the Radial Filter, draw an oval and make sure to choose Inside.
- Make the adjustments. After you've applied the filter to the image, you’re ready to tweak the Sharpen, Radius, and Threshold values.
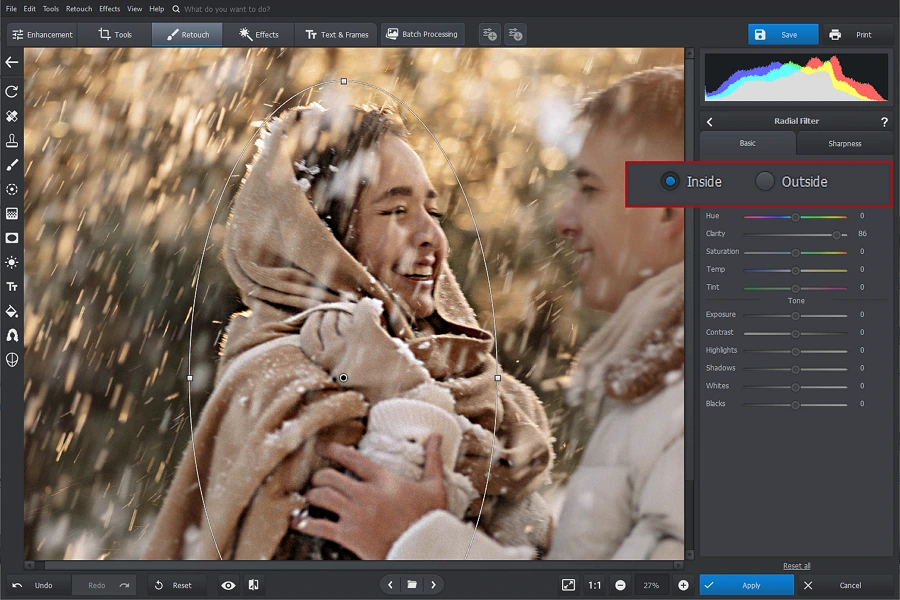
Adjust the size and position of the filter
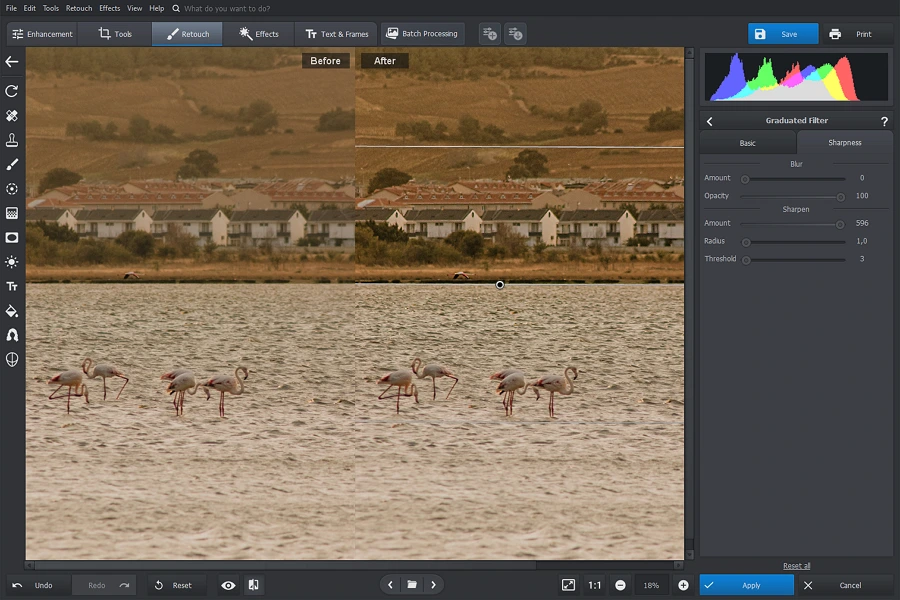
Drag the sliders to set the strength of the sharpness effect
Want to unblur your photos with ease?
Press the button below to smoothly upgrade your pictures in PhotoWorks:
Part 2: How to Fix Blurry Pictures on Mac
If you’re an Apple user, you won’t even need to download anything on your computer. All iOS-powered smartphones and Mac computers come with a free photo editor pre-installed in the gallery app. This is how to fix a blurry photo on a Mac:
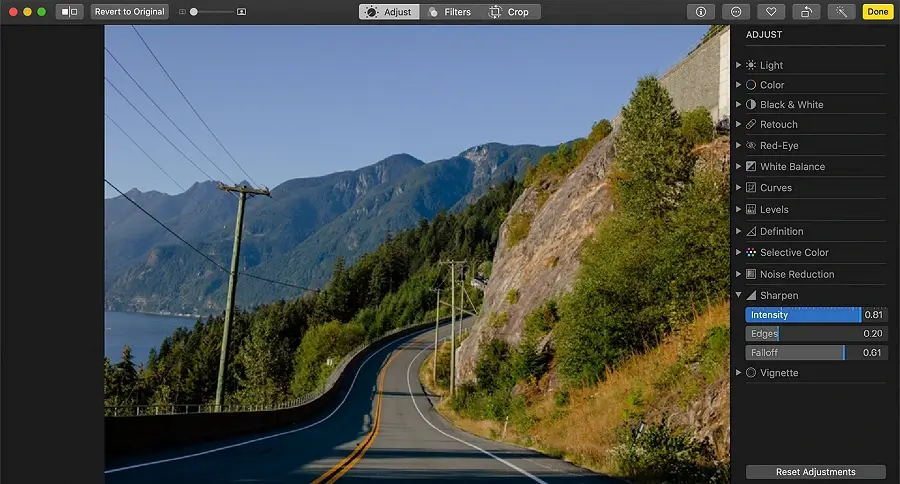
1. Open the Photos app and select the image you’re going to clarify. To fix the picture, switch to the photo editing mode by hitting Edit.
2. Click Adjust and open the Sharpen tab - move the sliders to change the level of Intensity, Edges, and Falloff.
3. Finish editing by hitting Done.
Make images sharper for free on Mac
Part 3: How to Fix Blurry Pictures Online
Don’t want to install anything on your computer? Then online tools such as Photo Enhancer AI will help you out. In this service, you can denoise a picture, erase the background, upscale an image, etc. without leaving your browser. And here’s how to make photos clearer on this platform.
- Upload the picture. When you open the website, hit the red button to add your blurry image. Photo Enhancer AI lets you import several pictures at once. But make sure the files meet the website requirements, e.g., the maximum pixel size is 14 MP.
- Sharpen your image. Choose the Upscale feature, set the scale as 100%, and toggle on Face Refinement. Then click Start Processing to make the adjustments.
- Export the edited photo. Once the enhancement process is complete, click on the eye icon to open the preview window. If you’re satisfied with the result, hit Download Image to save it.
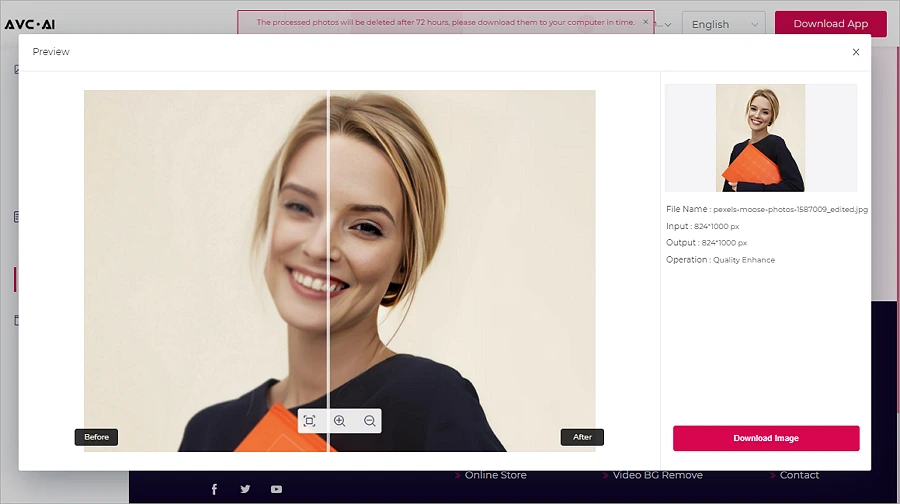
A couple of clicks and your image looks more detailed
Part 4: Best Mobile Apps to Unblur Photos
These days, you can find mobile programs for everything from entertainment and education to planning and shopping, and, of course, there are tons of mobile photo editors. But you don’t have to waste your time browsing the App Store or Google Play in search of apps to unblur photos. Here are a couple programs we tested for you and recommend trying.
1. VSCO
2. Lightroom
3. Afterlight
4. Pixlr
1. VSCO
Compatibility: iOS, Android
Price: Free (Basic), $19.99/year (VSCO Membership)
VSCO is one of the most popular programs among Instagrammers that allows you to make basic adjustments and apply cool filters to your pictures. It’s a multi-purpose photo editor that you can install for free, but you’ll have to create a VSCO account and sign in to use it.
So why do VSCO kids like the app? Probably for these features.
Pros:
Cons:
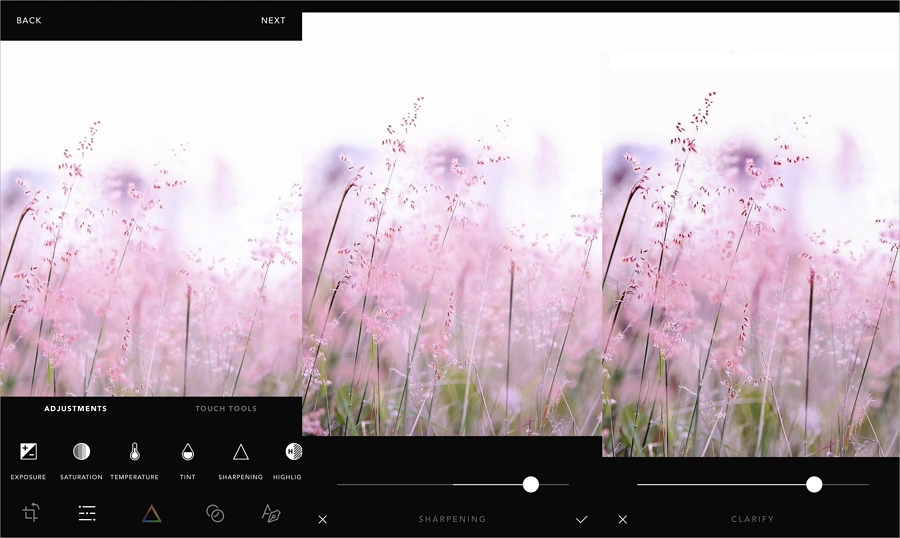
How to Fix Blurry Pictures in VSCO?
Follow these simple steps to edit pictures in his app:
- Clarify: Once you open a photo, go to the Clarity panel and move the slider but don’t overdo the setting - it’s just the beginning.
- Sharpen: Now turn up sharpness - here you can pump the setting to the extreme.
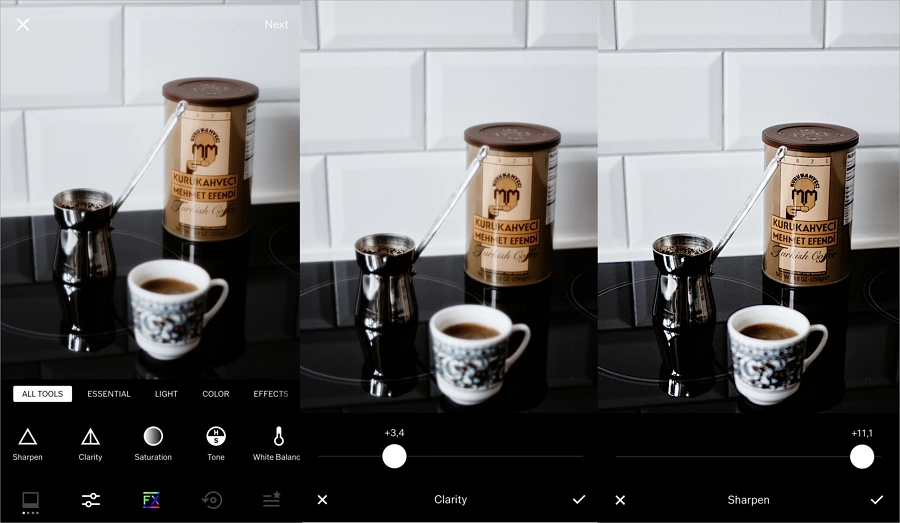
Use VSCO to prepare your pics for social media
2. Lightroom
Compatibility: iOS, Android
Price: Free
If you want to have an Adobe product in your pocket, then Lightroom’s mobile version is the right option for you. It is a free photo editor but subscription owners can also unlock the full features and use the cloud storage. For example, you could start editing a photo on your computer and polish it off on the way to college or work which is so convenient.
The unblurring app is worth checking out since it offers these features.
Pros:
Cons:
How to Sharpen Unclear Photos in Lightroom?
Take a look at the steps below to learn how to enhance a blurry photo in this mobile app.
- Change the Sharpness amount: Tap Detail and drag the Sharpening slider to the right.
- Adjust the Radius degree: To refine the picture, increase the Radius level.
- Add detail: Perfect the result by turning up the Detail setting.
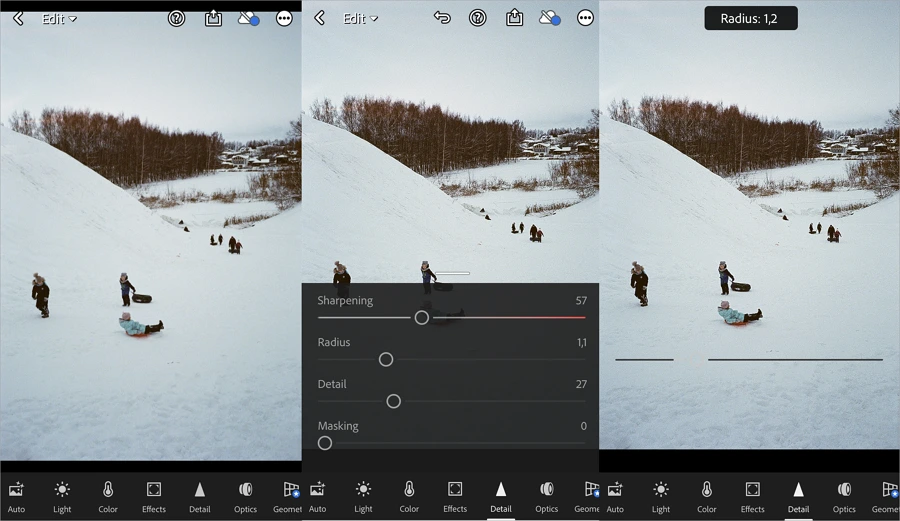
Clear up your pictures for free in the iconic Lightroom app
3. Afterlight
Compatibility: iOS, Android
Price: Free (Basic), $2.99/month (Afterlight Pro)
Afterlight is a feature-rich program that lets you make a photo not blurry, enhance images with curves, apply frames, join pictures in double exposure, and so on. Even though there's a bunch of ready-to-use filters, you can also create your own. With such a toolkit, you can definitely upgrade your photos like a pro, but get ready for a steep learning curve.
Here's what makes Afterlight stand out:
Pros:
Cons:
How to Unblur Photos in Afterlight?
To sharpen blurry images in Afterlight, follow these steps:
- Sharpen: Unblur your photograph by dragging the Sharpening slider to the right - set the value at 90-100. To save the changes, hit the tick icon.
- Clear up: Adjust the amount of Clarify to denoise the picture.
Try Afterlight to fix your images offline
4. Pixlr
Compatibility: iOS, Android
Price: Free (Basic), $7.99/month (Premium), $12.99/month (Team)
In case you want a beginner-friendly photo editor just for quick fixes, you should take a look at Pixlr. It’s a lightweight app that unblurs pictures, crops and resizes photos, automatically color corrects images, applies filters, and more. Pixlr also offers simple tools for removing skin imperfections and fixing the red eye effect.
Install Pixlr on your device if you're looking for:
Pros:
Cons:
How to Make a Picture Unblurry with Pixlr?
These are the steps you need to follow to sharpen your images in the photo editor.
- Sharpen: Select the Sharpen tool in the menu and move the slider to set the effect amount. Tap the icon in the right corner to compare the original picture with the result.
- Adjust the radius: Now hit Radius to increase its value and make the photo look more detailed.
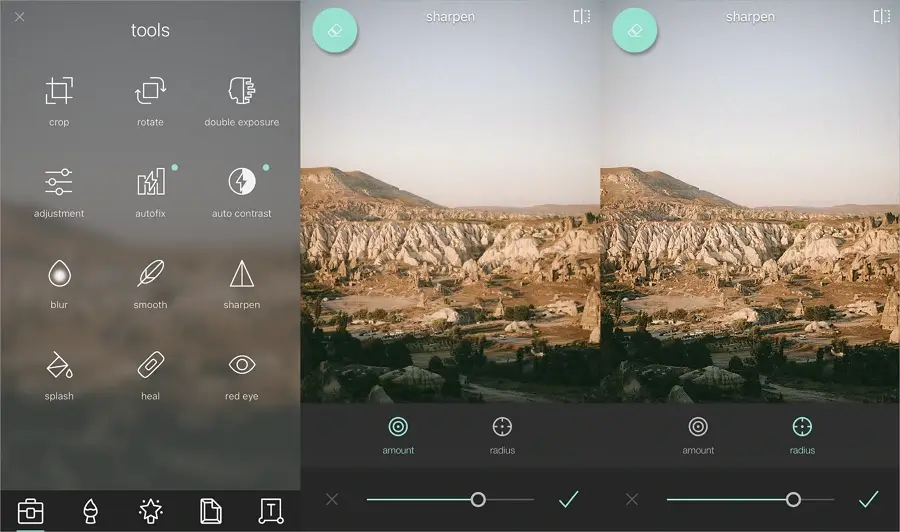
Refine images in the simple Pixlr app
Part 5: Photo Sharpening Tips
Regardless of the software you choose, there are ultimate ways that will work out in any situation. Here are a few tips to avoid blurry pictures while or after taking photos.
Tips to Fix Blurry Images in Post-Production
The following adjustments won’t remove the blur completely, but the image will look much more detailed this way. So if you have a blurry photo, fix it by changing these settings:
▷ increase the Contrast amount
▷ set a lower value of Highlights
▷ reduce the level of Shadows
Tips to Avoid Blurry Pictures While Shooting
There are a few things you can do to snap images that are initially sharp. Here are some tricks professional photographers and bloggers like to use, so don’t hesitate to give them a shot.
1. Keep Yourself Steady
This might sound too obvious, but the truth is we hardly ever stand still. There are a few tricks photographers use to avoid camera shakes. For starters, you can make your body steady by leaning against a wall or a tree. If your hands are shaking, bring the camera closer to your body and hold the camera near your chest - be sure to hold it with both hands.
2. Turn Off Auto Mode
Auto Mode is sure a time saver - you don’t have to adjust all the camera settings and can enjoy the shooting process to the fullest. But the seconds you could spend on camera adjustment are likely to turn into hours of post-production, especially if you use Auto Focus Modes - cameras can get easily confused by other objects or even focus on the background rather than on the model. So it will be better if you keep it under your control.
3. Use Internal Camera and Lens Stabilization
For a clear picture, it’s important to turn on the stabilization setting. There are different types of stabilization and each manufacturer chooses one or the other, but they all will guarantee you high-quality photos. However, some gears don’t have such an option - look it up in the camera’s manual or check it out in the settings menu.
4. Use a Tripod
Whether your camera offers stabilization or not, you can always use a tripod instead. The device will let you take sharp photos with both a camera and a regular smartphone. With bloggers taking over the Internet, it’s become so easy to get a tripod that only professionals used before. So take advantage of the trend and get yourself a tripod while it’s so affordable.
Say Goodbye to Blurry Pictures - Final Thoughts
Wasn’t it frustrating to deal with blurry photos after every photoshoot? But you’ve left the problem behind - now you know how to prevent it and how to sharpen images you already took with ease. With the programs we discussed in this article, you can even enhance pictures from the Internet to use them in your project for school or work - and they will always have a professional look.
It’s time to look through our guide one more time, pick the photo editor you like the most, and perfect your pictures!
Get Rid of Other Common Photography Problems:
Use the trouble-free PhotoWorks and fix your image real quick