How to Fix an Overexposed Photo

Sunshine can be a saving grace for photographers with no powerful lighting equipment. But it might also be a nuisance since no one can tune it down on a whim. You may capture a perfect moment, along with too much light for this picturesque scene to be clearly visible. Thankfully, there are multiple ways to work around the problem of overexposed shots.
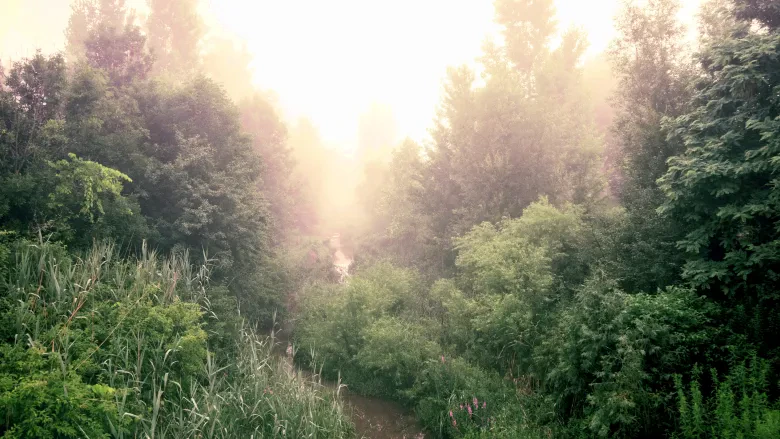
This overexposed photo was fixed in PhotoWorks
In this article, we will cover the technical aspects of exposure and go over the programs that can fix a blown out photo. We will also provide tips on how to expose pictures properly from the get-go.
Contents:
1. What is overexposure2. How to read the histogram
3. How to fix an overexposed photo
4. How to take well-exposed images
How to Understand the Problem of Overexposure
Overexposed images mainly come as a result of one of the two – either your camera assesses the light incorrectly, or your eyes do. Your camera has fixed settings, depending on which it calculates whether the shaded areas are over a few stops darker than the lit ones. Therefore, it is imperative to control the amount of light that hits the camera sensors. As technology evolves, this issue becomes easier to deal with but remains fundamental.
Meanwhile, your eyes constantly adapt and may deceive you because of it. A habit of looking at the screen instead of the viewfinder is also detrimental. After all, a small camera screen is not designed to display the finer aspects of the image. But equipped with the knowledge of the causes, we can work towards the solution to the overexposure problem.
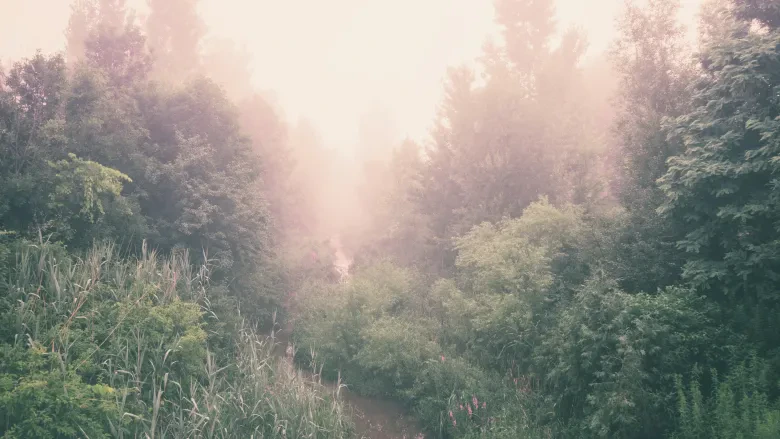
Here is what overexposure looks like
Reading the Histogram
A histogram is a graph that demonstrates the range of tone in your image. It reflects the intensity of dark, medium, and light tones. Some graphic editors and cameras divide the histogram into corresponding sections for convenience. When you have no proper display available to take a thorough look at your shots, a histogram will tell you all that you need to know.
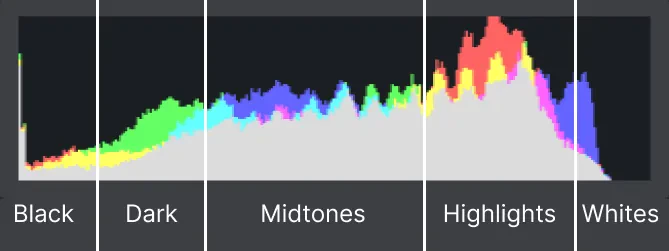
Histogram – an “x-ray” of a photograph
Normally, a histogram of a successful photograph is relatively smooth and has no intense spikes or breaks. It means the shot is satiated with the entire color spectrum. Gaps and oddities signalize that something is off. A gap in the leftmost part of the histogram means a lack of black and deep dark tones in the shot. That is a telltale sign of overexposure in your photo.
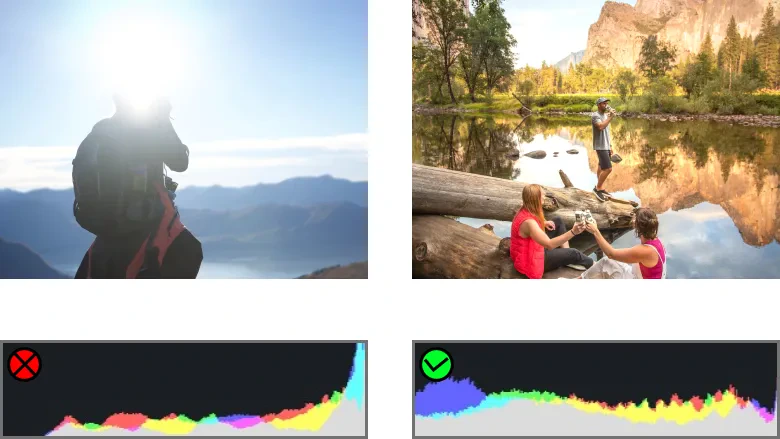
Comparison of shots with a “good” and “bad” histogram
If you see a gap in the histogram on your camera, then the best course of action is to readjust the camera settings and take another picture. In case you don’t have an opportunity to do a reshoot, let’s see what you can do for fixing the overexposed photos you have.
How to Fix an Overexposed Photo: 5 Easy Ways
1. Use Auto Correction Tool
Overexposure is a common occurrence that can be delegated to automatics. If you want to run the automatic overexposed photo fix, do as follows:
1. Download the PhotoWorks installation file and run it. Then follow on-screen instructions to set up the program. Once this is done, launch PhotoWorks from the desktop icon.
2. Click Open Photo and select the overlighted picture you wish to edit. Or simply drag and drop an image into the program window from anywhere.
3. Stay on the Enhancement tab and click the Auto Correction button.
4. Let the program work its magic. The engine used to enhance images can handle most of the standard problems related to overexposure.
5. If the autofix results satisfy you, click the Save button.
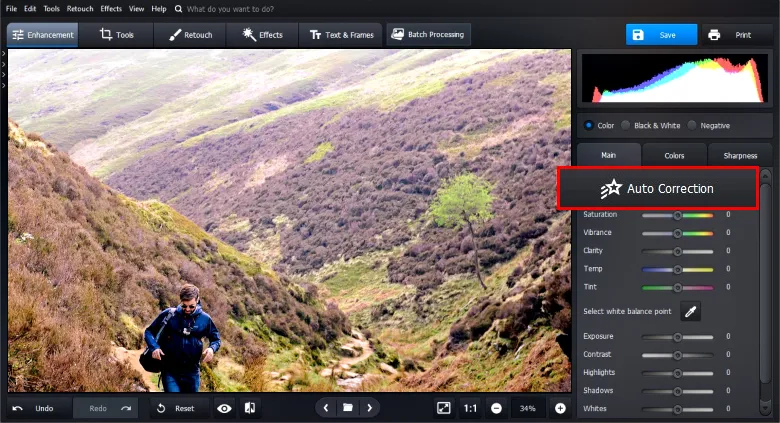
Fix the shot with a single button click
2. Adjust the Exposure
You can fix the lighting in photos yourself and achieve more precise results compared to those automatic tools may provide you. Here’s how to edit overexposed photos manually in PhotoWorks:
1. Open the file you need to process.
2. Go to the tone section of the Enhancement tab in the right part of the window.
3. Move the Exposure slider to the left to make the image less lit. Pay attention to the histogram – it will shift as you adjust the exposure and fill the gap on the left. You can also fix an underexposed shot by dragging the same slider to the right.
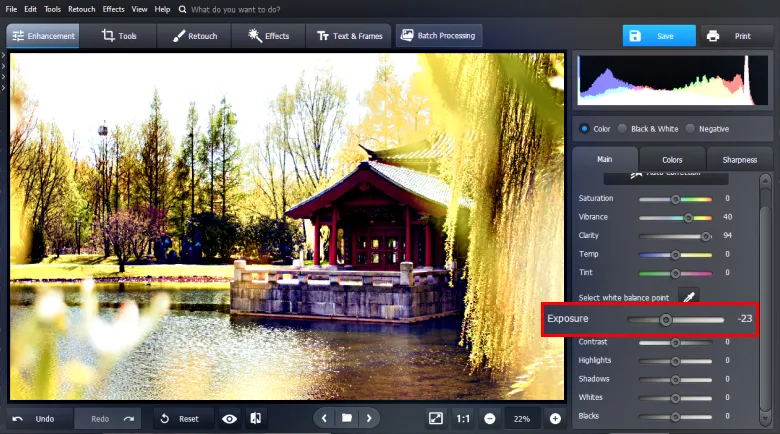
Make your image look its best with manual fine-tuning
Changes in exposure apply to every single pixel of your image. Dark parts of the picture are affected as well, so reducing the exposure level too much may undesirably change the photo.
3. Adjust Whites and Highlights
Overall exposure applies to all parts of the image indiscriminately, which means it can ruin parts of the histogram that are actually fine. In this case, you should correct only a certain part of the spectrum. Let’s see how to fix the lighting in photos by changing the whites and highlights.
To adjust only whites, do this:
1. Open an image, go to the tone section and drag the Exposure slider to the left.
2. To add some white without further affecting the black, move the Whites slider to the right.
Highlights include a wider tone range than whites alone. To adjust Highlights, do this:
1. Move the Whites slider to the left to fix the exposure. However, the excessive brightness might still remain, making the image look somewhat flat.
2. Move the Highlight slider to restore the details.

Use combinations of whites and highlights to get the best effects
Dark tones and blacks also have corresponding sliders in the tone section. Tweak them to make the image more dynamic or fix a photo with too much backlight.
4. Fix a Landscape with an Overexposed Sky
Landscape photos often get blurry due to the huge tone margin between lit skies and dark ground. The camera often cannot properly register this huge difference. As a result, the land gets too dark, or the sky gets too bright. If the ground part has turned out just fine, you can fix the sky above with the Graduated Filter. Here’s how to fix a landscape with an overexposed sky using this feature:
1. Open the image and navigate to the Retouch tab.
2. Find the Graduated Filter in the toolkit on the right and choose it.
3. To apply the filter, left-click on the upper part of the frame, and without releasing the mouse button, drag the cursor down to the horizon, covering the sky area.
4. Adjust the tone sliders to make the sky more clear and vivid.
5. Click Apply for changes to take effect.
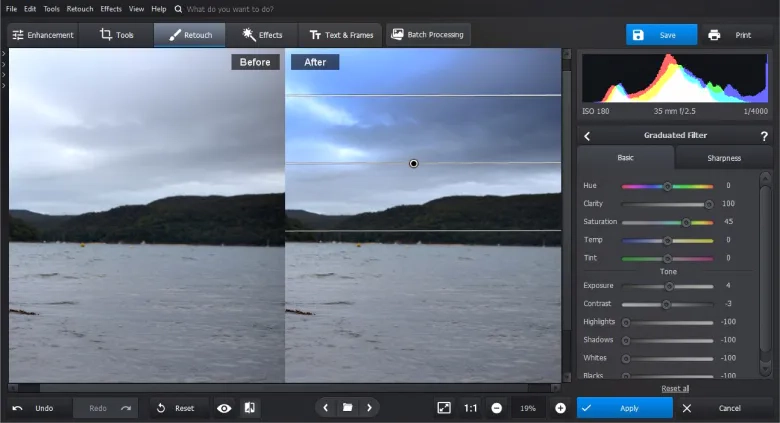
Correct one part of the shot without altering the other
5. Fix An Extremely Overexposed Photo
Sometimes the image gets so lit that no editing can restore its clarity. However, even with all the science attached, photography is still an art form, and a broken rule may cause an interesting effect. So, instead of wondering how to fix an extremely overexposed photo, why not roll with it?
Try to focus your editing efforts on the centerpiece of your composition and let the background be completely white. All that detail-free room might work as negative space and enhance the focal points. PhotoWorks has a tool named Enhancement Brush. With this brush, you can highlight only certain parts of an image and adjust exposure, contrast, and other parameters for those parts only.
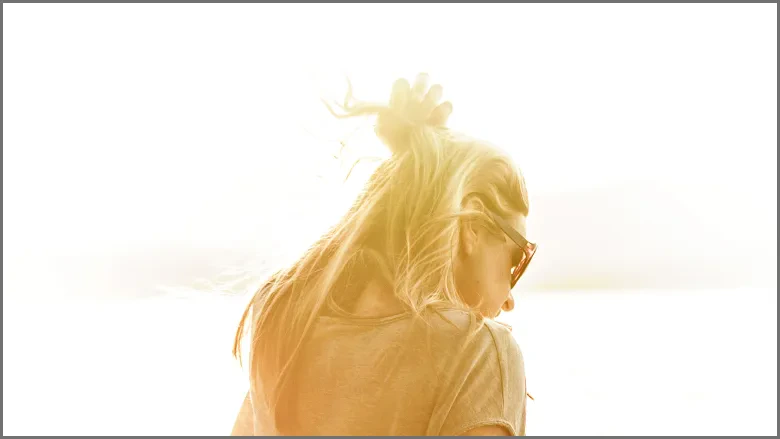
Overexposed shots can be quite artistic
Exposure correction in PhotoWorks can also resolve other issues. For example, it can help with haziness and fix backlit photos.
How to Take Well-Exposed Images: Pro Tips
Now you know how to fix an overexposed photo, but let’s take a look at some ways to avoid this issue altogether. When you prepare for the next photo session, remember a golden rule – a picture that’s a little too bright is easier to fix than a picture that’s too dark. So, if you will ever have to pick underexposed vs overexposed shots, remember – the latter is better. To achieve the best result, keep this rule in mind and follow these valuable tips:
- Remember the exposure triangle.
It is a simple scheme that depicts the relation between ISO, aperture, and shutter speed. From this, you can figure out how to alter these parameters to make your image brighter or darker.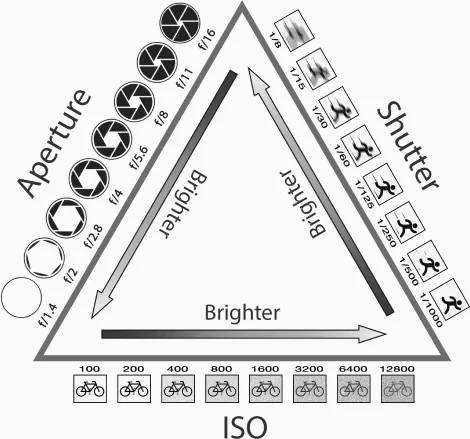
This is how ISO, aperture, and shutter speed influence the brightness
- Do the bracketing.
Bracketing is a technique of blending a few versions of the same shot in one picture to compensate for the drawbacks of different exposure values.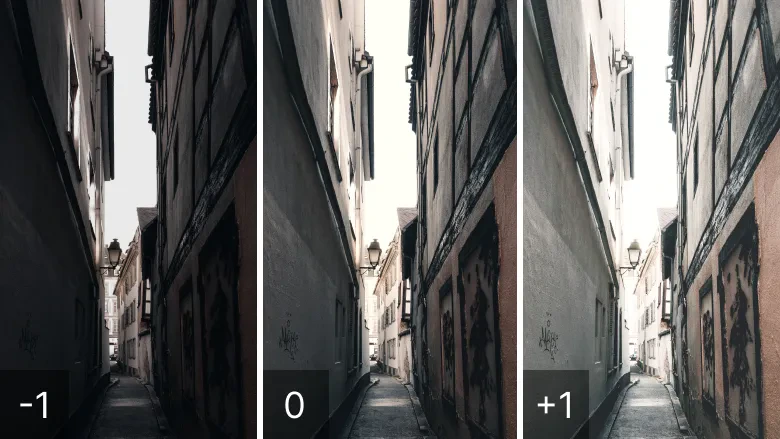
Cheat the dynamic range of your camera with bracketing
Here’s how it works. Take a shot with any setting you see fit. It will count as 0. Then reduce the shutter speed to grab more light, which will be +1. And then, increase the shutter speed to take a shot with less light, that will be -1. You can also try changing ISO or aperture and taking three more shots in the same way, or icrease the margin between the shutter speed values.
The next step is to open the set of taken pictures in Lightroom or another photo editor with the feature of merging bracketed images into one. This will create a photo with a high dynamic range (HDR). With this technique done right, the overall exposure will even out, and the details will be clear across the whole shot.
You can also try doing bracketing on an iPhone, for example. Modern mobile devices have enough settings and apps available to do the bracketing on the go. In any case, for the bracketing to have the best result, the camera and the scene must be static. - Use graduated filters.
Graduated filters allow applying color and exposure correction only to a part of the image. You can use this feature in various photo editors, including PhotoWorks, Lightroom, and Photoshop. This tool works best for fixing images that are clearly divided into bright and dark parts, such as a landscape with overexposed sky, but a finely detailed ground.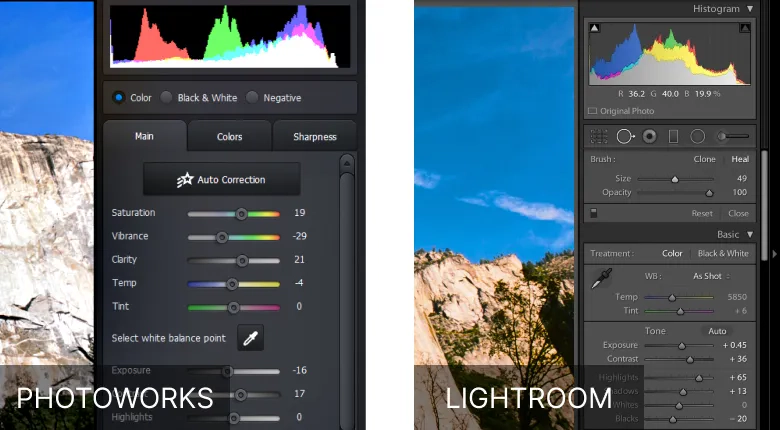
Graduated filter in PhotoWorks compared to Lightroom’s
Within the selected filter area, you can alter most of the parameters – sharpness and blur, saturation and tint, highlight and shadows, and more. The total amount of available filter settings may vary from program to program though.

Bring the image into balance by fixing one half
- Use a Curves Layer in Photoshop.
Adobe Photoshop has a curves layer feature. With it, you can adjust any tone of your shot with great precision - just alter the values of dark and bright parts of the tone range. Or adjust the exposure level for the entire picture. And since this tool creates a separate layer, you can mess around with no risk of harming the original image.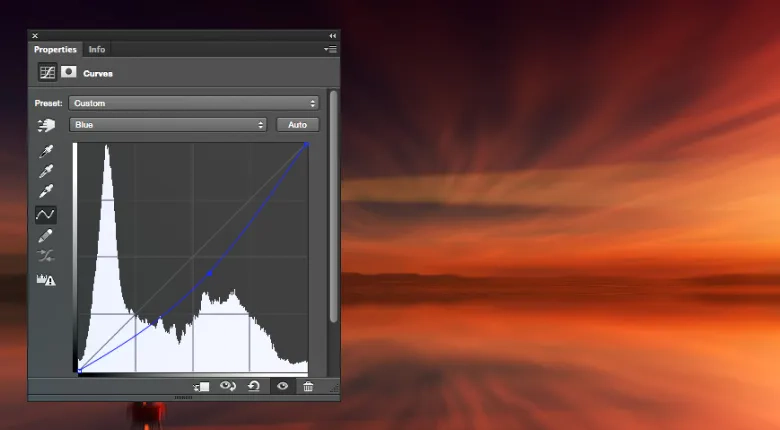
Work on the histogram directly with curves control
PhotoWorks also has a similar feature, but it is easier to use. This handy program does not create a separate layer but allows comparing the result to the original with the before/after button. Besides, it employs non-destructive editing and saves the edits as a new image without altering the original one. So, you are free to experiment.
What More Can You Do with PhotoWorks
PhotoWorks provides an extensive toolkit for all-around photo editing. Here are some of the key things you can do in this versatile program:
- Adjust exposure, sharpness, and blurriness
- Enhance images with lots of filters and effects
- Remove people and objects from the image
- Correct colors manually or with an AI-tool
- Impose images in creative ways
Get Rid of Other Common Photography Problems:
Do it in a few clicks with a powerful photo editor!