How to Superimpose Images: Tips and Tricks
 5.0
Votes: 2
(Rated: )
5.0
Votes: 2
(Rated: )
The art of photography goes way beyond pointing your camera at something and pushing a button. There are a ton of tricks you can pull to create otherworldly images with your photos. One cool technique we would like to tell you about is superimposing photographs.
Superimposing is a way to overlay images. The result can be quite artistic, as well as plainly fun. And you can achieve it with photo editors that are much more user-friendly than, for example, Photoshop. Let’s see how to superimpose images with 3 other programs: for PC, Mac, and iOS.
1. iPhone overlay with Snapseed
2. Superimposing images on PC
3. macOS overlay with GIMP
How to Superimpose Pictures on an iPhone
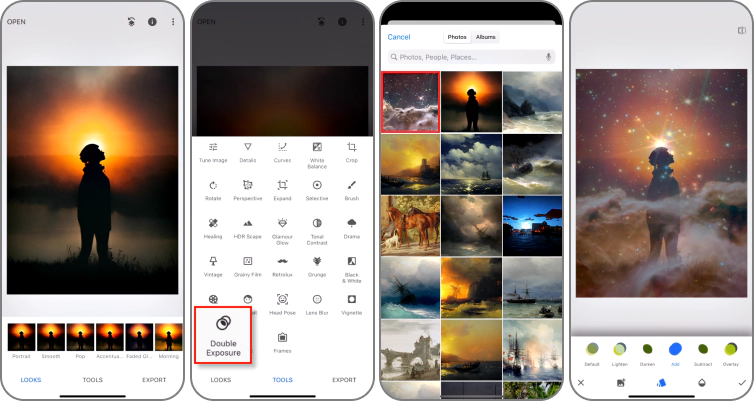
Snapseed is a photo editor for mobile devices, and it is much more than just a photo overlay app. It brings enough features to the table, from RAW file processing to advanced curve controls and more. Snapseed can superimpose photos and create unique effects with a dedicated function called Double Exposure. Here’s how to insert a picture into another picture on an iPhone:
1. Start the program. Download the app on your device and run it.
2. Load the base image. Open the photo that will serve as the background.
3. Add an image to impose. Call out the Tools menu and choose the Double Exposure. Then tap the photo icon below and choose your second image.
4. Set the picture in place. The second photo will appear over the first one. You can move, rotate, and change its size with your fingers as you see fit.
5. Enhance the imposed pic. Tap the card icon to switch to the brightness options for the upper photo. Or choose the droplet icon if you want to adjust its opacity.
6. Save the edited image. Once you're satisfied, tap the checkmark icon to export the image.
This is how to overlay pictures on an iPhone, whenever and wherever inspiration comes to you! With a reliable photo editor in your pocket, you can make cool montages on the go. However, there’s a downside – fingers are less accurate than a mouse cursor. Thus, in case you need more precision, it might be better to use something with mouse or stylus controls.
Send your photo to space with Double Exposure
How to Superimpose Images on a PC
If you want to blend some photos on a personal computer, PhotoWorks is the program you need. It is an all-purpose photo editor with a comprehensive toolkit and powerful AI features. The software is capable of enhancing any of your photos. Superimposing images is also on the table. You can create expressive montages in a minute, just open your images in the program and pull some sliders, and that’s it! Let’s go over how to overlay pictures with PhotoWorks step-by-step:
Step 1. Install the Program
Click the button below to get the PhotoWorks installation file. Then run this file and follow the on-screen instructions. Once the program is set up, run it from the desktop icon.
Step 2. Load the Base Image
Click Open Photo and open your image via the file browser. Or just drag and drop the larger picture to the program window. It shall serve as the backdrop for the picture you want to impose on top.
Step 3. Lay the Second Image Over
Switch to the Tools tab and navigate to the Image Overlay tool. Choose the Add Image from File option to import the smaller picture from your PC. Alternatively, drag and drop the top image into the program window and pick Overlay in the pop-up menu. You can also overlay some clipart from the program library. Now use your mouse to move, resize, and rotate the upper photo and find a perfect spot for it. Adjust the opacity and shadow of the imposed image on the Settings subtab.

Play around with the composition and find the perfect spot for the upper piece
Step 4. Export Your Photo Montage
When both pieces are in place, use other PhotoWorks tools to enhance your montage. For instance, try color correction, filters, and effects for better expression. You can also add custom captions to personalize your montage or place a watermark to protect your copyrights. When all is ready, click the Save button and export the super imposed pictures as a single image to your destination folder.
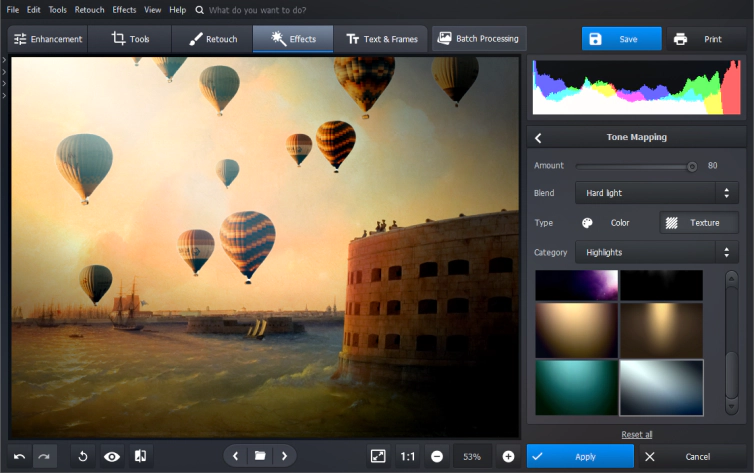
Apply some finishing touches to make your picture pop
Want to see PhotoWorks in action? Watch this short video guide. It demonstrates a few more cases you might come across and provides some inspiring ideas for the process.
What Else You Can Do in PhotoWorks:
- Fix exposure and haziness in photos
- Add objects to pictures and remove passersby
- Apply color correction, expressive filters, and effects
- Change or erase backgrounds and replace dull skies
- Retouch and decorate photos with stickers, frames, and titles
How to Superimpose Images on a Mac
If you are a Mac owner, then you need a program other than those described above since Snapseed and PhotoWorks are not available for macOS yet. You can photo superimpose with GIMP – a free photo editor, that is good for Apple computers. However, newbies may find GIMP off-putting, since it looks like Photoshop and has a learning curve. Here’s how to add a picture to a picture with it:
Step 1. Install the Program
GIMP is open source and works great as a superimpose freeware. Grab your copy from the official website. Then run the installation file, set up the program, and start it.
Step 2. Open the Images
Click File, and choose Open from the drop-down list. Select the first image and click Open. Click File again and import the second image. It will appear in another window.
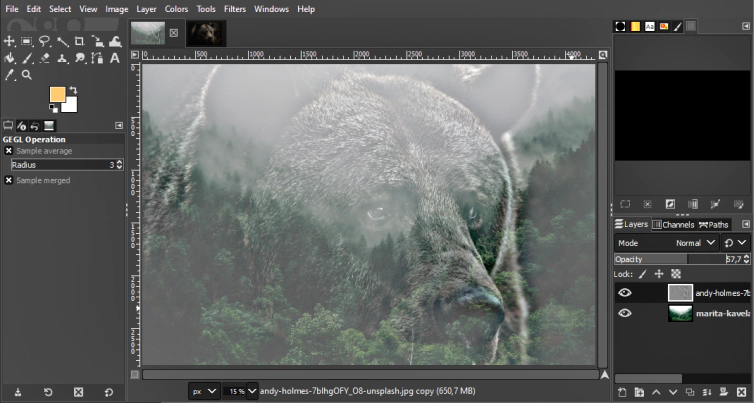
Step 3. Impose Your Picture
Open the foreground image window, go to the Edit menu and click Copy. Then switch to the window with the background photo, open the Edit menu again, click Paste As and choose New Layer.
Assemble the puzzle by adding your top image to the background
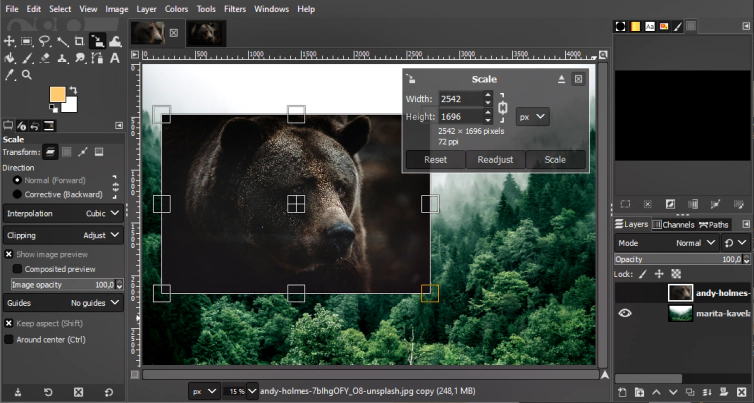
Step 4. Edit the Top Image
Use the Scale Tool to adjust the size of the sample and place it where you want. As a separate layer, you can edit the top image in any way – crop, cut, blur – with no risk of harming the base image.
Make the piece fit to make your picture complete
Step 5. Export as a New Image
Once the upper picture looks perfectly in place, you can go to the File menu. There you need to select Export As and save the super imposed photos as a new image.
Final Thoughts
Now you know how to put one picture on top of another on an iPhone, PC, and Mac. The room for creativity is as infinite as the number of tools you could use. And we have presented the three of the most notable today. Try making something new from your existing images, and overlay pictures in the apps we have distinguished depending on your needs and the available device.