Searching for a video editing program can be intimidating, especially to non-professionals. For your convenience, we made a comparison chart based on the compatibility, price, and usability of the top 6 programs. Let’s see which option suits you best.


 5.0
Votes: 2
(Rated: )
6 Easiest Ways to Remove Black Bars from a Video
Black borders often appear at the top and bottom or on the sides of a video. Sometimes, they give it the old-style TV show vibes, but in most cases, black lines makes the footage look clunky. But there’s a way out, even 6, and we’ll introduce them to you in this post! You’ll learn how to remove black bars from a video with iMovie on Mac and iOS devices, desktop programs for Windows, and an online video editor.
The programs we’ll show you differ greatly from each other in terms of functionality, ease of use, cost, and tech specs. So, we recommend you check out the comparison chart and then take a look at the step-by-step instructions that will help you with video editing. Not only will we show you how to get rid of black bars on a video, but we’ll also discuss common reasons why they appear so that you can avoid the issue later on. Now, why don’t we get started?
2. Why do videos have black borders
3. How to get rid of black bars
6 Ways to Remove Black Bars from a Video - Comparison Chart
| Features | Clipify Download | Windows Movie Maker Download | VLC Download | iMovie Download |
|
Clideo Download | Shotcut Download |
|---|---|---|---|---|---|---|---|
| OS | Windows | Windows | Windows, macOS, Linux | macOS | iOS | Any(browser-based) | |
| Price | Free; PRO version from $29.40 | Free, Pro version for $19.99 | Free | Free | Free | $72/ann. | |
| Target audience | Prosumer and beginner | Beginner | Beginner | Prosumer | Amateur | Beginner | |
| Clear interface | |||||||
| Tutorials | |||||||
| Output video quality | 360p, 480p, 540p, HD, Full HD | HD, Full HD | 240p, 360p, 480p, HD, Full HD | 540p, HD, Full HD, 4K | 360p, 540p, HD, Full HD, 4K | 480p, HD, Full HD, 4K | |
| Best for | All-purpose video editing | Editing on Windows |
Simple editing tasks |
Video editing on Mac |
Quick editing on the go |
Making basic adjustments online | |
| Final score | 9.5 | 9 | 8 | 9.5 | 7 | 8.5 |
Where Do Black Bars on Videos Come From

Here are examples of the wrong video aspect ratio
The reason your video might have black bars is the wrong aspect ratio - the ratio of the width to its height. The most popular aspect ratios are 16:9 and 4:3. While 4:3 is more common in photography, 16:9 is the most appropriate for shooting videos. The thing is, modern displays like TV sets, tablets, phones, and computers typically have a 16:9 aspect ratio display. Internet platforms such as Netflix, YouTube, and TikTok also use 16:9 or 9:16 aspect ratios.
If you play a video with a 4:3 aspect ratio on a widescreen display, the video either gets awkwardly cropped or black bars appear and fill in the gaps. This is why it’s important to change the aspect ratio and crop a video in a program to make it fit the display or platform requirements where you’re going to play it.
Guidelines on How to Get Rid of Black Bars
Now that you know what causes the black lines on the sides of a video, you can easily correct the issue. Here are 6 effective methods that you can try right away - we’ll briefly discuss each program and guide you through the editing process step by step.
1. How to Remove Black Bars from Video on Windows
To improve your footage on Windows, try Clipify, a desktop video editor that both budding and seasoned enthusiasts will enjoy using. Here, you can remove black bars in a moment both manually and automatically. Along with a user-friendly interface, Clipify offers a huge set of AI-run tools and video enhancement options: stabilize a shaky video in one click, color correct the footage using Curves, stylize it with filters, change the background, and add one of 200+ free tracks. For a cinematic feel, you can also use the Pan & Zoom effects.
In other words, Clipify lets you create movie-like videos with minimum effort and skill. But the software is only available for Windows. If you want to remove black bars from a video on a PC, follow these simple steps, either automatically or with custom adjustments in Clipify:
Step 1. Install Clipify on Your PC
Download the installation file on your computer by clicking on the button below, launch it, and follow the wizard. Then run the video editor.
Step 2. Add the Footage
To import the video you’re going to edit, click Add Videos and Photos and select the file - it will be automatically added to the timeline. Alternatively, you can drag and drop it from the folder.
Step 3. Remove Black Bars from the Video
Hit the Fill Frame button to automatically crop the video. To cut the black borders out of the footage manually, choose the cropping tool and pick the aspect ratio you need. Now drag the handles to adjust the selection.
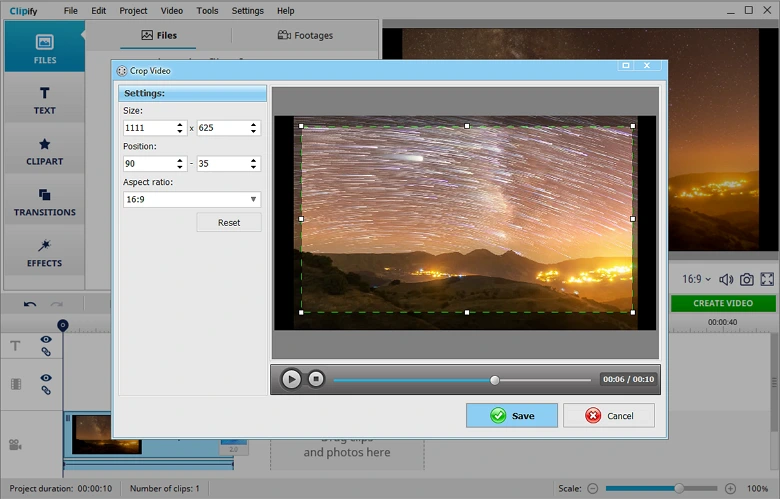
Get rid of the black borders
Step 4. Save the Edited Video
When you’re done editing your video, preview the result and click Create Video. Burn it to DVD, export as an HD video, AVI, MP4, or create a video for the Internet - browse through the formats and pick the one you need.
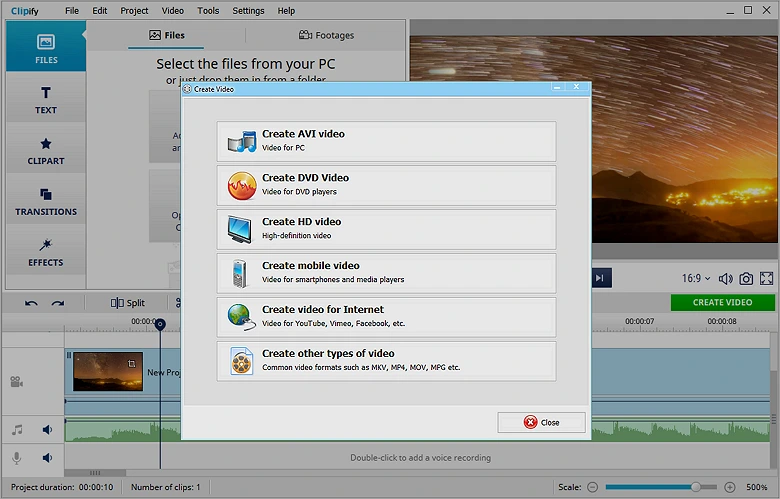
Choose the right format to play the video on a smaller or bigger screen
Want to quickly remove black borders from a video?
Use Clipify to edit them out for free today
2. How to Use Windows Movie Maker to Remove Black Bars
Windows Movie Maker, also known as Windows Live Movie Maker, is a video editor with basic functions that used to come with all Windows computers. Now you need to download it from the Microsoft Store. It offers such features as adding captions, music, animated intro titles, rotating clips, fading in and out audio tracks, etc. You can also make your footage horizontal or vertical in this video editor.
One downside is that the software often freezes and crashes when processing big files. Another disadvantage is that you can only save the edited videos in 2 formats: MP4 and WMV. But if you already have the default Windows video editor, or only need basic tools without any bells and whistles, then you can use Windows Movie Maker to remove black bars, and here’s how:
Step 1. Import a Video File
After you launch the program, pick the Crop Video tool and select your footage.
Step 2. Change the Aspect Ratio
Click on Select Ratio and choose one of the options.
Step 3. Save the New Video
Hit the Save Video button to export the edited video.
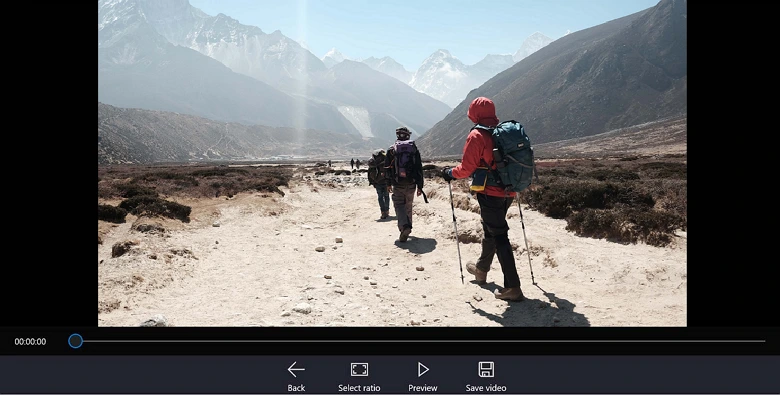
Use Windows Movie Maker to make basic improvements on Windows
3. How to Remove Black Borders from Video Using VLC
VLC is an open-source media player compatible with Linux, macOS, and Windows, including older versions like Windows XP and Vista. It doesn’t have the cutting-edge functionality of pro-level video editors like Sony Vegas, but it still offers a couple of useful features. For example, you can use it to cut, split, merge, and rotate videos. Getting rid of black borders is also possible with this video player.
Even though VLC media player doesn’t require any video editing experience, you’ll need a bunch of tutorials to figure out how to navigate it. If you already have the player on your computer and want to know how to remove the black bars from the sides of a video, then follow these instructions:
Step 1. Open Your Video
In the Media drop-down menu, click Open File and select a video.
Step 2. Remove the Black Bars
To get rid of the black borders, click on Tools, choose Effect and Filters, and select Crop in the Video Effects tab. Now you need to manually type in the value in pixels from the Top/Bottom/Left/Right direction to define the areas you want to remove.
Step 3. Save the Changes
In the Tools menu, choose Preferences. Set the Show Settings as All and select the Cropadd video filter. Type in the exact same values you entered earlier and click Save.
Step 4. Export the New Video
Go to Media and select Convert/Save. Finally, click Add, choose the video file, and pick the Convert option in the Convert/Save drop-down menu to select a file format and a destination folder.

VLC, a player with video editing tools
4. How to Remove Black Bars from Video with iMovie on Mac
If you are a Mac user, then you already have a video editor at your disposal. iMovie is designed specifically for Apple products and is built into almost all devices by default, but you can also download it from the App Store. With this program, you can remove black lines by selecting one of ready-to-use aspect ratios. iMovie will also be useful for cutting and merging clips, fixing changing the speed, keying out and replacing the background with another, and adding a background song from the iTunes library.
Your Mac computer or laptop should meet several technical requirements: macOS 12.6 or later, 4 GB RAM, and 3.6 GB of available disk space. If there’s no problem with them, then you can use iMovie to remove black bars from your footage - here’s what you need to do:
Step 1. Open the Footage with Black Borders
Run iMovie and click Create Project. Select the video clip you want to edit.
Step 2. Crop the Video
Hit the Crop button and pick the Crop to Fill option.
Step 3. Save the Output Video on Mac
Click on the blue checkmark to save the adjustments, hit Share, and select Export Movie.
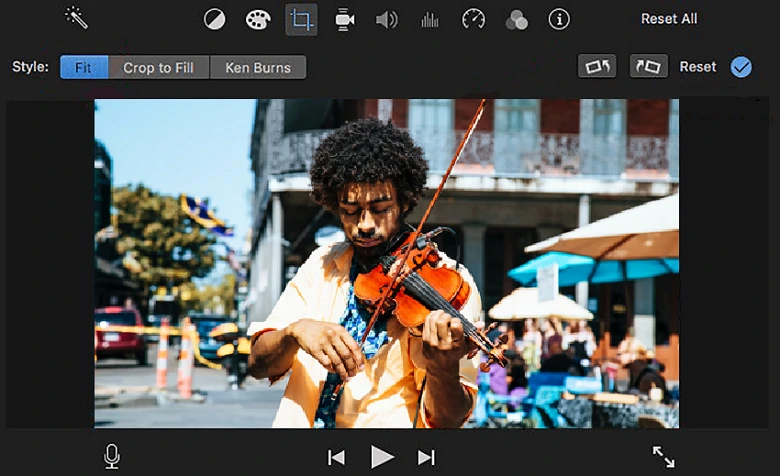
Edit your footage on Mac for free
5. How to Get Rid of Black Bars with iPhone Video Editor
If you want to edit your footage on an Apple smartphone, you can do it with iMovie for iOS. The mobile version provides fewer editing tools, but it’s as easy to use as iMovie for Mac. By the way, you can use both of the app versions by editing video on your iPhone and using AirDrop or iCloud Drive to wirelessly send it to your Mac. Here, you can make the final touches like color correction and animated maps.
The drawback iMovie has is the lack of export options. Besides, the Mac version is more suitable for bigger projects. Even though the interface and toolkit of the iOS app are slightly different, the video editor still lets you remove unwanted black lines using a handy cropping tool. Here is how to get rid of black bars on iPhone videos:
Step 1. Start a New Project
First, launch the app and select Movie. Choose the video from the Camera Roll and tap Create Movie.
Step 2. Cut the Black Bars out of the Video
To remove black bars from the vertical video, tap on the clip, choose the Crop tool, and drag the markers.
Step 3. Save the Changes
Tap Done to finish editing. Then you can preview the video and export it to your device.
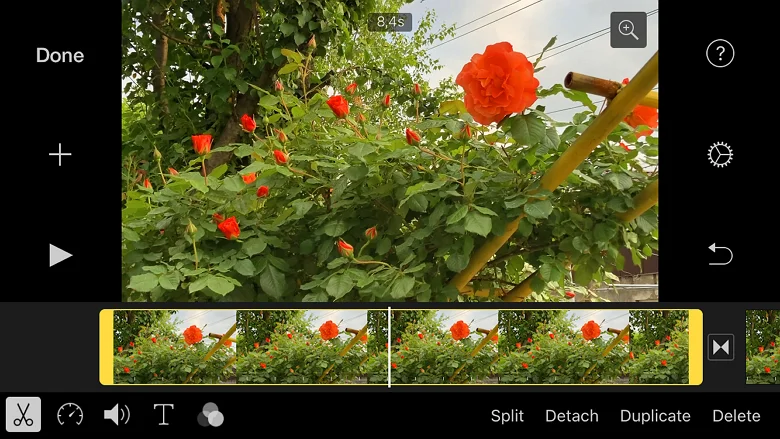
Use the mobile iMovie app to remove black bars
6. How to Get Rid of Black Bars on Video Online
Clideo is a cloud-based service that you can access from any device. There's a seperate tool for cropping videos and removing black borders. It’s more popular among beginners as there’s no steep learning curve. The intuitive interface and low price of Clideo make the program a viable option for basic video editing.
In terms of graphics and effects, Clideo is less powerful than its online contenders. Besides, for those who simply want to crop a single video, paying $9 for monthly access might seem a bit steep - it’s worth it only if you do it on a regular basis and want to remove the Clideo’s watermark. If this simple tool is all you need, then follow these steps to remove black bars from a video online:
Step 1. Upload the Footage
When you open the official website of Clideo, click Create Project and choose the Crop Video tool. Click Choose File to import the video you want to change.
Step 2. Remove the Black Borders
To crop black bars from the video, set the aspect ratio and choose the area you need to keep by moving the selection. You can also change the exact video size in pixels.
Step 3. Save the Cropped Video
In the lower-left corner, open the Format menu and select the video type you need. Finally, hit the Export button and wait till the video gets processed - you can export it to your computer, Google Drive, and Dropbox.
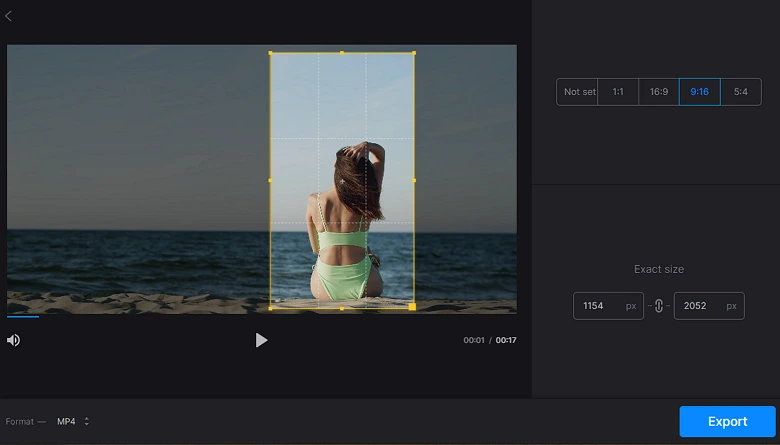
Clideo, an online video editor for quick improvements
Summary
Black bars are a sore point with anyone who ever tried to record a video. In this article, we’ve covered 6 surefire ways to remove black borders using video editors for Windows, Mac, iOS, and Web. To sum up, Apple users can edit their clips with iMovie on both Mac and iPhone. You can also use Clipify, VLC, or Windows Movie Maker to remove black bars on your PC. To edit a video online, use the cloud-based Clideo.
Even though black bars can be annoying, they might give a video a professional look if used wisely - here’s how you can add cinematic bars that don’t look clunky in a video.
Use Clipify to enhance your videos in mere seconds
