How to Make an Image Background Transparent:
6 Easy Ways for PC Users

Do you keep your own blog? Then you probably need images with a transparent background to make your posts eye-catching. Or maybe you want to try digital scrapbooking and combine pictures with a clear background in a stunning collage? But if you've ever tried to select and cut an image background manually, you surely know it's a tall order that can leave you exhausted. Wanna learn how to make the background of a picture transparent? Let's do it right now!

Achieve the same result with a free trial of PhotoWorks! Click the button below
and get started with the easiest photo editing program.
Keep reading this guide and discover 6 easy ways to get a transparent background on your PC. They involve different tools and programs (from free to affordable and even premium), so you could choose whichever is best for you.
Method 1. Remove a photo background in user-friendly PhotoWorks
Method 2. Delete an image backdrop with an online service
Method 3. Create a transparent background using Photoshop
Method 4. Use PowerPoint to erase a picture background
Method 5. Make a transparent background in Paint 3D
Method 6. Turn any background transparent with Publisher
Below we will describe each method, name its pros and cons, and provide a detailed guide on how to create a transparent background with the help of each program. Ready to learn some new tricks? Let's begin then!
Method 1. Remove a Photo Background in PhotoWorks
If you aren't very experienced in photo editing, complex software isn't your best option. Choose an easy-to-use program that performs advanced edits just in a few clicks. PhotoWorks is a fine example of such an application: this picture editor for PC features an intuitive interface and a variety of handy photo editing tools (background replacement is among them). See it for yourself in this video!
Prefer written tutorials? Then open your image in the program and follow these simple steps.
Step 1. Choose the "Change Background" Tool
Under the "Tools" tab, find the "Change Background" button and click it. You will see a super short video tutorial on how to use the tool.
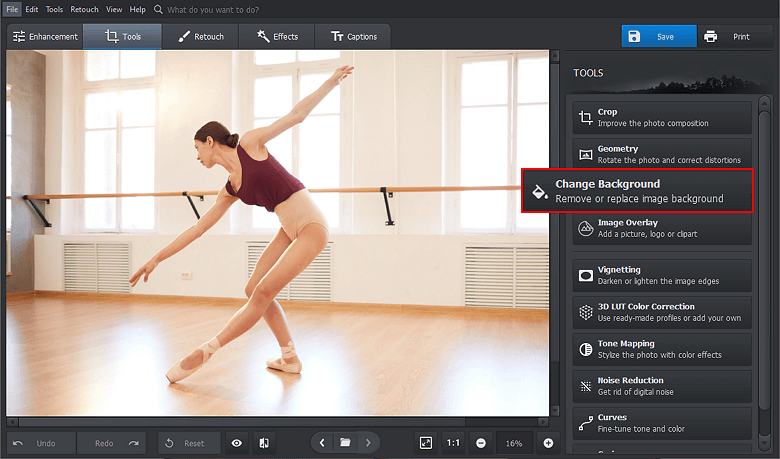
PhotoWorks features a special tool for removing a photo background
Step 2. Select the Object and the Background
Next, you need to roughly outline the main object with the green brush and highlight the background with the red one. Please note: draw the object outline inside its boundaries, and mark the background outside. Use the Eraser to remove unwanted lines.
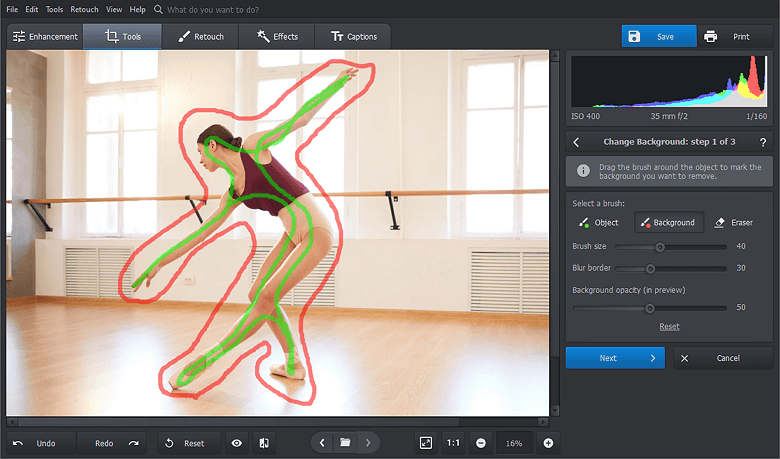
Draw an approximate outline, there is no need for absolute precision
Step 3. Make Corrections If Necessary
Click "Next". Now you see the main object and the semi-transparent background, which is about to be deleted. Adjust the selection if needed.
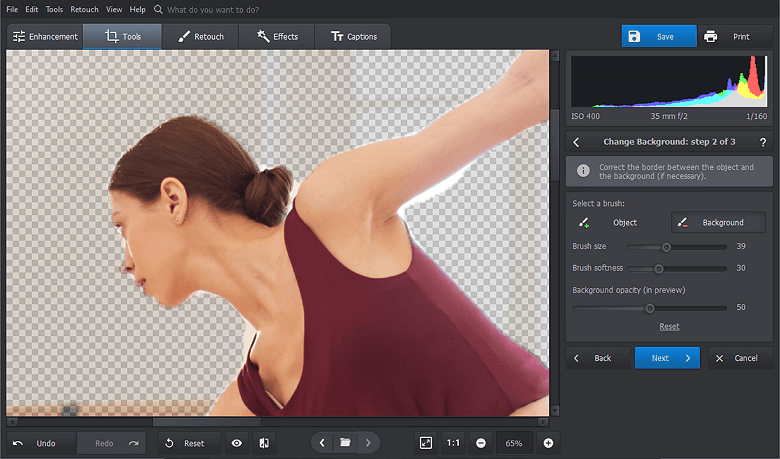
Click the "Object" and "Background" buttons to make adjustments
Step 4. Remove the Background and Save the Result
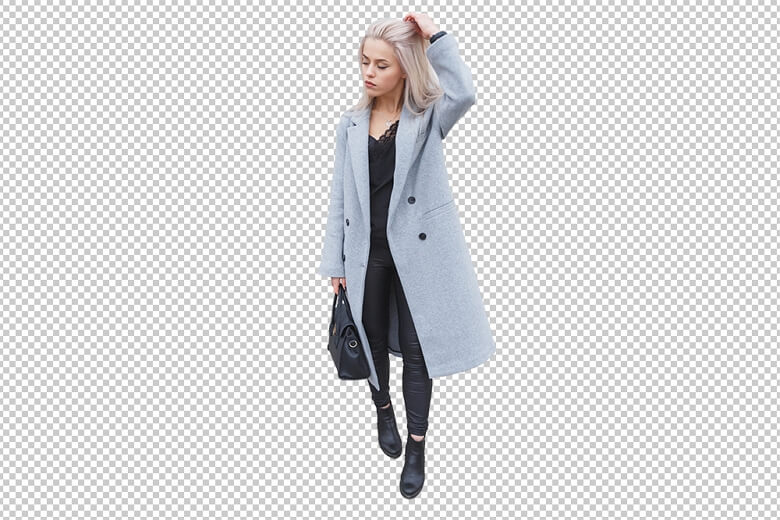
The background is removed, but the edges of the main object might look too rough. Move the "Blur edge" and "Extend edge" sliders to achieve a more natural look. Click "Save with transparent background" and choose a name for your new PNG file. Congrats!
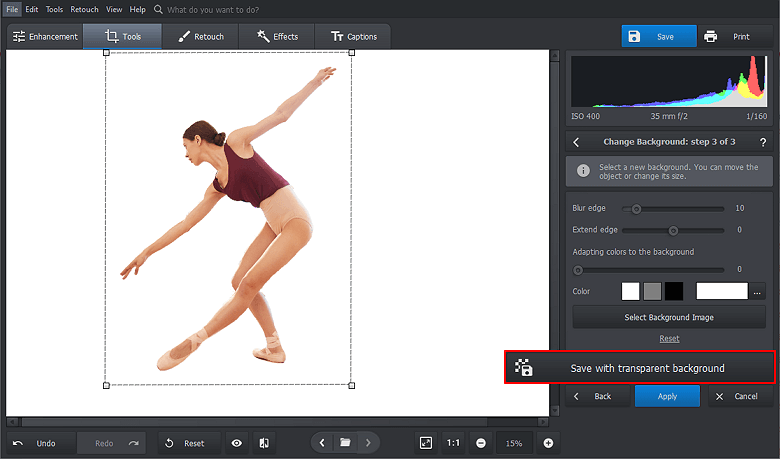
Transparency achieved!
PhotoWorks supports lots of other useful features, designed for photo enthusiasts and amateurs. Wanna check them? Download the program and put it to the test during the free trial period.
Method 2. Delete an Image Backdrop with an Online Service
If you don’t want to install a new program on your device, try Transparent Background Maker. This online service lets you create images with transparent backdrops in just one click. Simply upload your pic and this AI-powered program will automatically erase the background, without any manual selections. Plus, it’s completely free! Here’s a quick tutorial on how you can use it:
Step 1. Load Your Photo
Open the service page and either click Upload Image or simply drag & drop the picture where you want a transparent backdrop. Make sure the photo’s resolution is no larger than 3000 x 3000.
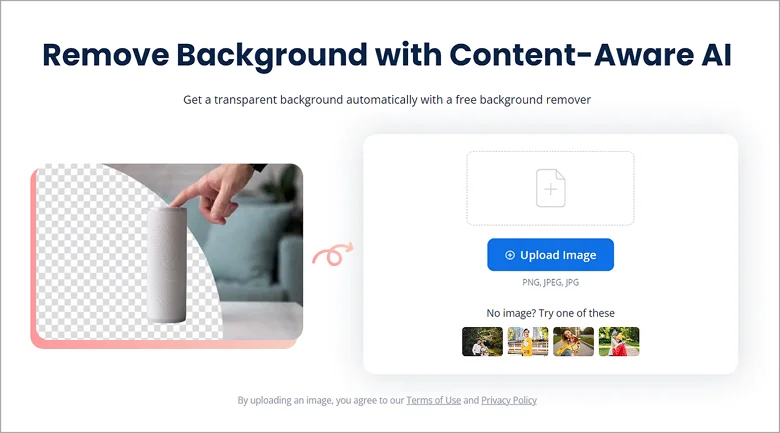
Upload a pic with the background you want to delete
Step 2. Save the Result
To get your image with a transparent background, just click the Save Photo button and download it to your device.
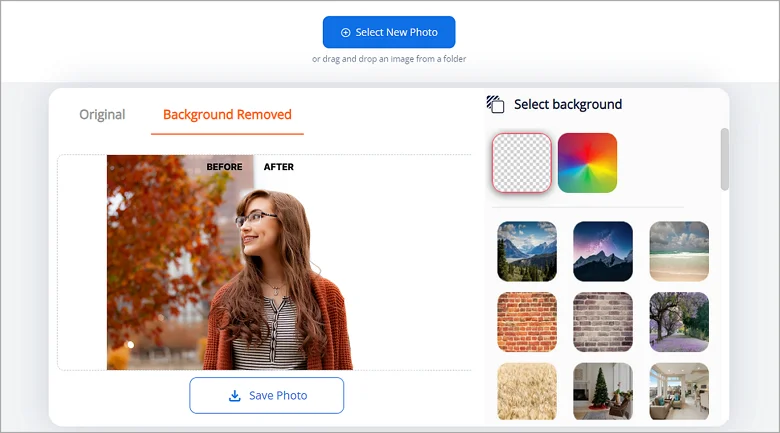
Enjoy the result immediately
Method 3. Create a Transparent Background Using Photoshop
Photoshop is probably the most famous photo editing program. Its name has even entered the common lexicon as a widely used verb meaning "to process an image". However, the complexity of this powerful solution (together with high prices) severely limits the number of Photoshop users. If you are lucky enough to have already purchased the licence or the subscription to Adobe Creative Cloud, here is the instruction on removing a picture background with Photoshop tools.
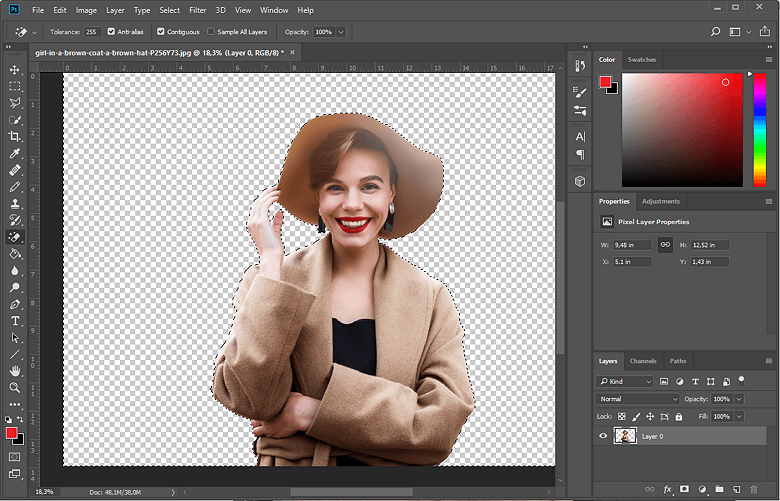
Step 1. Mark the Main Object
Find the Toolbar on the left side of the work area. Click "Quick Selection Tool", adjust its size and left-click on the outline of the object you want to preserve. The program will perform automatic selection to facilitate the task.
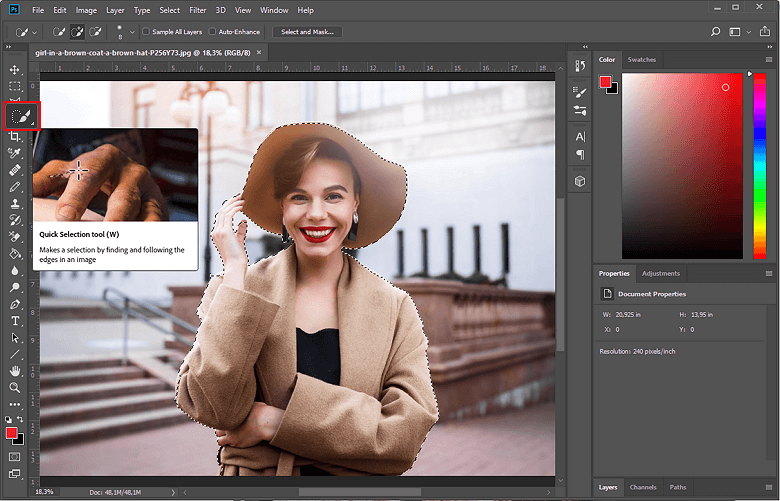
The Quick Selection Tool is optimal in most cases
Step 2. Correct the Selection
If automatic selection mistakenly covers certain parts of the background, correct the outline by choosing the "Subtract from Selection" mode. Adjust the brush diameter to make it more precise.

The resulting selection should look like this
Step 3. Turn the Background Transparent
Once you are satisfied with the selection, invert it by opening the context menu and choosing "Select Inverse". The selection now encompasses the background and leaves the main object out. The "Delete" key removes the background for good and makes it transparent.
Press "Delete" and enjoy the final result
By the way, Photoshop is quite resource-intensive. If you have to process images on an old PC with little RAM, consider using an online photo editor that functions with virtually any hardware. For example, try LunaPic - a free web-based application that allows you to make an image background transparent among other cool things.
Method 4. Use PowerPoint to Erase a Picture Background
PowerPoint is commonly known as a mundane tool for making presentations and slideshows. But it is actually much smarter than that! Among other image processing tools, PowerPoint supports the automatic removal of a picture background. If you already have Microsoft Office (2010 or later) on your PC, it will be the cheapest way to convert a background to transparent. Unfortunately, the earlier versions of PowerPoint don't feature the background removal option.
Step 1. Insert Your Picture and Click "Remove Background"
Left-click on your image, open the Format tab and find the "Remove Background" button. The program will automatically select the background, but certain parts of the main object can also get into the selection.
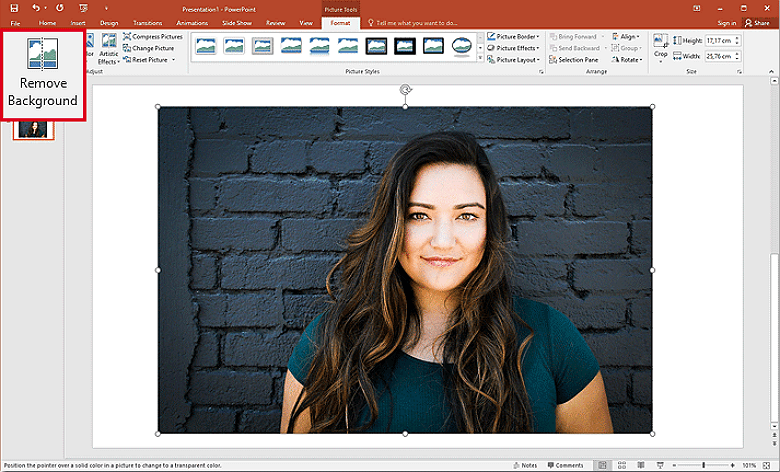
PowerPoint automatically detects the background
Step 2. Make Corrections If Necessary
It is quite easy to adjust the selection. All you need to do is to put the cursor on a disputable area and see what PowerPoint suggests to do. If you see a "+" symbol, left-click this area to select it as the background. If you see a "-", click to deselect it.
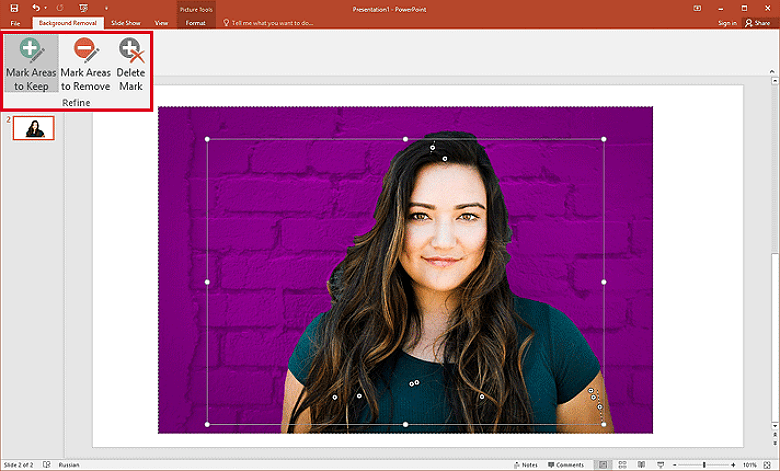
Sometimes you have to adjust the selection manually
Step 3. Give an Image a Transparent Background and Save It
As soon as the selection is correct, left-click outside the photo to apply the changes and erase the background. Save the image as PNG (in JPG the transparency will be replaced by the white color).
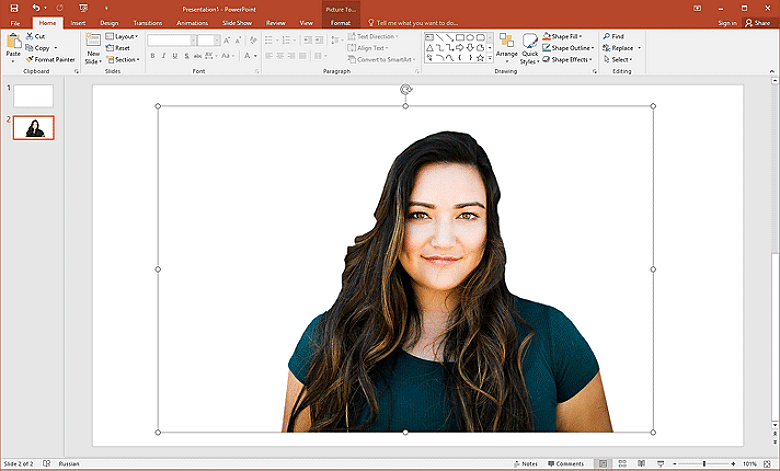
You get a wonderful pic with a transparent background
Method 5. Make a Transparent Background in Paint 3D
If you are a happy user of Windows 10, you can use Paint 3D to remove an image background. Being a basic graphic editor, this program can't handle complex editing tasks, but it supports background removal (and that's what we currently need). Unfortunately, Paint 3D doesn't facilitate our task: no automatic selection, no selection tweaking. The steadier your hand, the better.
Step 1. Open an Image and Turn on "Transparent Canvas"
Open the file you want to edit, open the "Canvas" sidebar and click the "Transparent Canvas" switch.
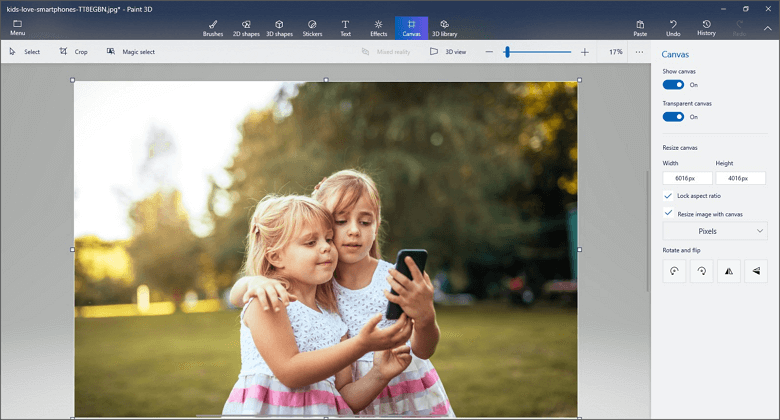
Click the "Transparent canvas" switch to turn it on
Step 2. Select and Cut the Background
Select the unwanted part of the image and cut it using the context menu or Ctrl+X combination. The selection will be replaced with a transparent background.
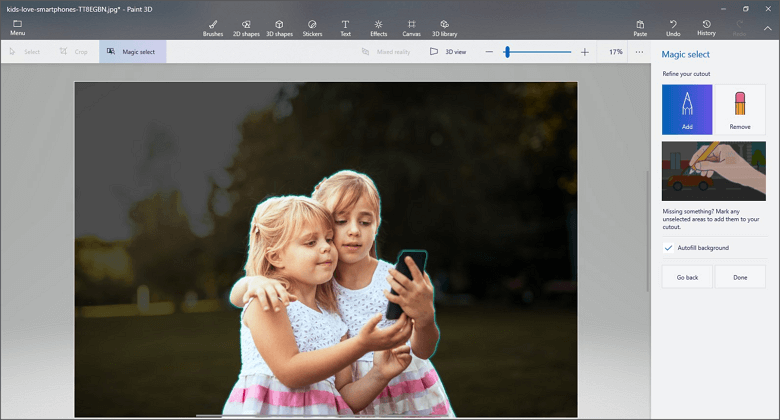
Be careful with your selection: there is no way to adjust it!
Step 3. Give an Image a Transparent Background and Save It
We are almost done. All that is left to do is to save the photo as a 2D PNG file. Later you will be able to replace the transparent background with something stunning.
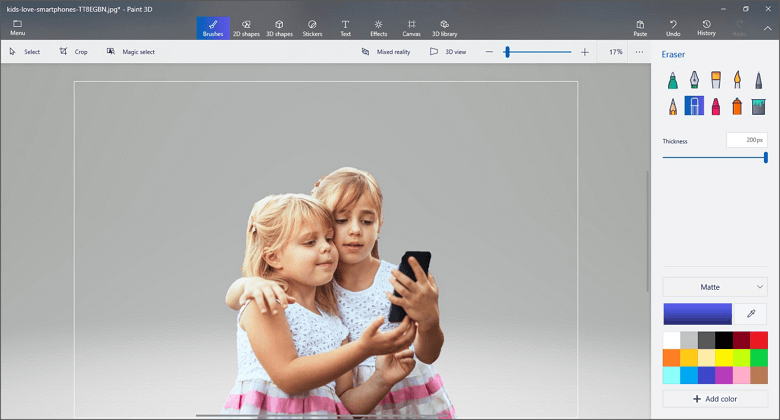
To keep the background transparent, choose the 2D PNG format
Method 6. Use Publisher to Turn a Background Transparent
Microsoft Publisher is a standard tool included in the Office package. It is meant for graphic design tasks, such as the creation of logos, business cards, posters, calendars, etc. Obviously, creating a transparent image background can come in handy in such situations - that's why Publisher supports such a feature. Alas, it handles only plain backgrounds, so don't overestimate it.
Step 1. Choose a Suitable Layout and Add Your Image
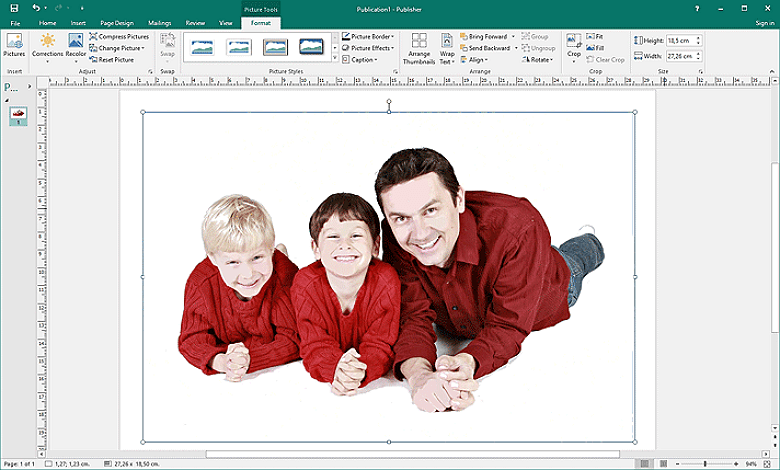
Import a picture with a solid background, otherwise the program will fail to detect it correctly and leave lots of unwanted pixels.

Choose a picture with a plain background
Step 2. Select "Recolor" in Picture Tools
Once you have chosen the suitable layout and imported the photo, open the "Picture Tools" menu and click "Recolor".
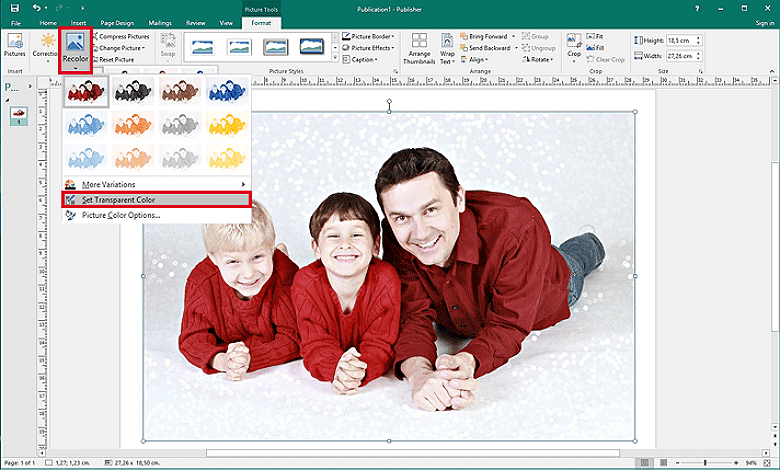
Select "Recolor" in the "Picture Tools" menu
Step 3. Turn the Existing Background Transparent
Under the "Recolor" button, you will see a dropdown list. Go for "Set Transparent Color" and watch the background magically erased.
Select "Set Transparent Color", and that's it!
We have covered 6 most convenient ways to remove an image background and make it transparent. Each of them has its pros and cons, so it's up to you to decide which one to choose. Photoshop is a costly solution that requires advanced photo editing skills. Publisher, PowerPoint and Paint 3D are humble tools with limited features, but they are available on most PCs and don't involve extra expenses.
PhotoWorks, however, looks like an optimal choice in this situation - it is affordable and easy to use, but the resulting image is on par with Photoshop-edited pics. What's more, PhotoWorks offers a truly rich and versatile toolkit. The program allows not only to add a background to pictures, but also to remove unwanted details, correct perspective distortions and apply trendy effects.
What is even better, it works miracles with portraits: you can use it to smooth skin, hide spots and wrinkles, remove greasy luster and add natural-looking digital makeup or even insert a face into another picture. Whatever program you choose, we wish you great results and unlimited creativity!