How to Process RAW Images Like a Pro


 3.4
Votes: 37
(Rated: )
Even if you are a newbie photographer, you've probably heard something about the RAW format. Many consider it the gold standard for shooting pictures, but it doesn't mean that only pro photographers can deal with it. Want to learn more about editing RAW images? If the answer is "yes", you're welcome to read our straightforward guide on the basics of RAW processing.
This article covers the key facts about the RAW format: what makes it different from other file types, what pros and cons it has, why most professional photographers choose it as their main shooting format, and why it might be difficult to process. Besides, you will learn how to edit RAW images and what graphic editors to use (spoilers alert: yes, you can totally do it without Photoshop).
Looking for a convenient RAW image editor?
Click the button below and start your free trial of PhotoWorks.
RAW vs. JPEG: Why Processing RAW Images Is Better
Most beginners take photos in JPEG since a RAW image file is much larger in size than the same picture in JPEG. Besides, RAW photos look rather bleak in their original state. But JPEG is a lossy format that considerably compresses digital data. The resulting images are convenient for simple editing and sharing over the Internet, but a lot of their original data is lost forever. If a JPEG image is overexposed and looks as a white spot, practically nothing can be done about it.
The RAW format, however, is another story. Its superpower is the ability to preserve all the data from your camera's sensor with minimum compressing. So, what is a RAW file? It is an image that contains as much shooting data as possible: colors, tones, textures and other fine details. We can salvage overexposed or underexposed photos and make dull images look amazing. But to reveal the hidden beauty of such pics, you need to get the knack of RAW processing.
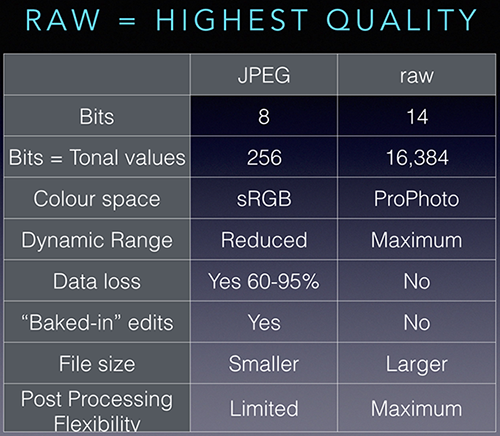
Note: there are dozens of formats that are falling in the group of RAW files. Each camera manufacturer offers a few of its own: for example, Sony cameras shoot in .ARW, .SRF, and .SR2, Canon in .CRW, .CR2, and .CR3 (and so on). But the common characteristic of all RAW formats is that they contain unprocessed image data, therefore our guide can be equally applied to all of them.
Pros and cons of the RAW format:
How to Edit RAW Photos in PhotoWorks Quickly and Easily
Although RAW formats are widely used by professional photographers and provide unlimited editing opportunities, many photo editors simply don't read RAW files. Adobe Lightroom and Photoshop are too expensive and over-sophisticated for most beginners, while free online editors often fail to process large files (to say nothing about problems caused by an unstable Internet connection). What should we do then? Fortunately, there are affordable yet powerful RAW photo editors - for example, PhotoWorks. It offers high-level editing options for a moderate price, and is much easier to master than Adobe products.
Want to check the RAW processing opportunities of PhotoWorks?
Download a free trial and enjoy working with RAW files.
Now let's proceed to the next part of our guide where you'll learn about two main methods of RAW files processing in PhotoWorks - automatic and manual. It's up to you to decide, which one is the best way to enhance your own photo.
Method 1. Use Auto Improvement Presets
When you open a RAW file, PhotoWorks suggests six editing presets: Default, Auto Enhancement, Landscape, Portrait, Sunny Day, and Black & White. You can apply any of them (or open the original image for manual processing).
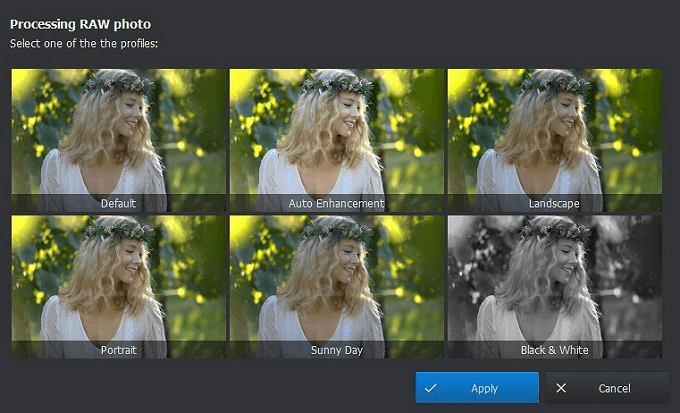
Choose any of the six available presets
After applying the automatic presets your image may still need some tweaking. Apply Auto Correction under the Enhancement tab - or adjust the settings manually. Move the sliders to change saturation, temperature, exposure, contrast and other image characteristics.
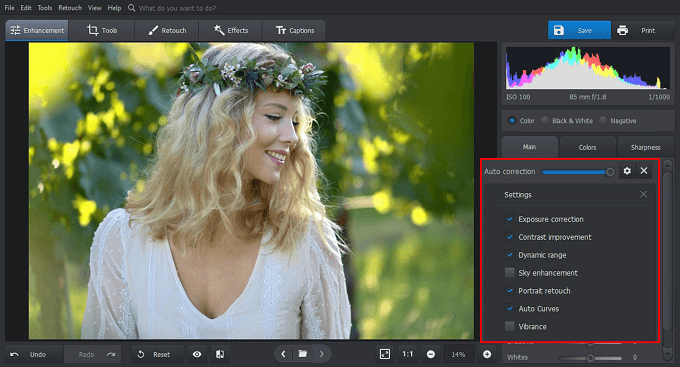
Apply Auto Correction or make manual adjustments
As a final touch, you can apply one-click effects and filters to create a special atmosphere or to make your image more impressive.
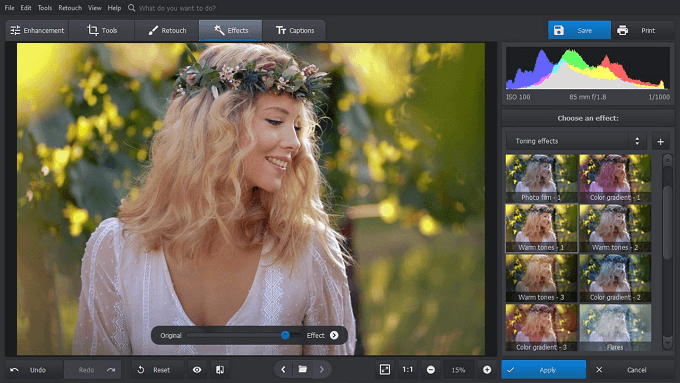
A trendy filter or a delicate toning effect would be a nice choice
Method 2. Enhance Your RAW Photos Manually
The automatic presets work great for those images that are almost perfect and need little improvement. If there are more serious problems with exposure or composition, they require some manual editing.
- Adjust Essential Settings
If your photo is severely overexposed or underexposed, open the Enhancement tab and move the Exposure slider. In case there are any color issues, fix them with the help of the Colors sliders, which are also located under the Enhancement tab. Remove dullness with the help of the Contrast slider, and increase Sharpness to bring out fine details.
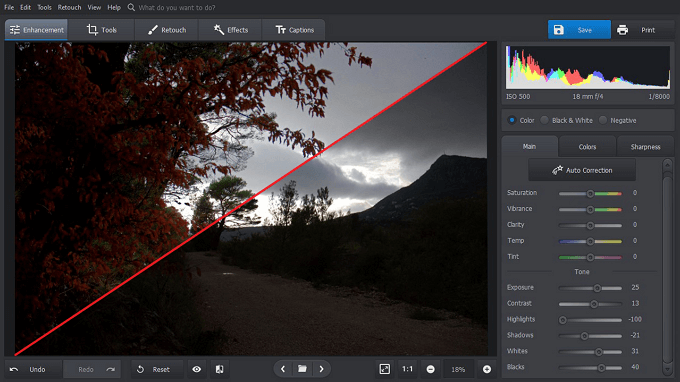
Make essential adjustments and see your pics transformed
- Fix Composition Flaws
Under this tab, you'll find a variety of tools: Crop, Geometry, Change Background, Vignetting, Noise Reduction, etc. In this case, we will use only the first two to improve our image. Click the Crop button to correct composition flaws and emphasize the main object. The grid overlay will help you draw attention to the right parts of your image: select the Rule of Thirds, the Golden Ratio or other presets. If there are lens or perspective distortions, go to the Geometry section to correct them.
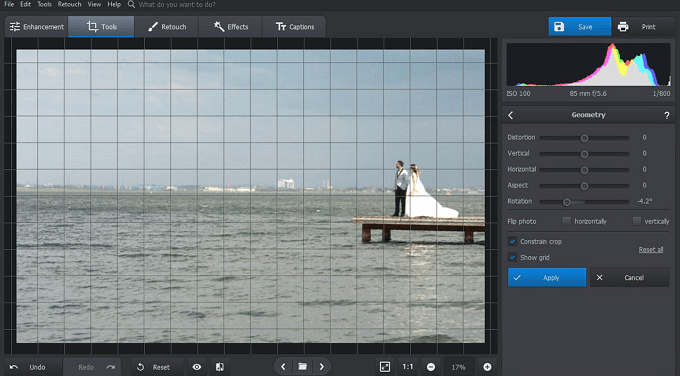
Fixing a tilted horizon is super easy!
- Improve Portraits and Landscapes
It's time to make your image really spectacular with the help of PhotoWorks' extra tools. If you are processing a RAW portrait, try Portrait Magic and Face Sculpt under the Retouch tab. Portrait Magic offers instant automatic enhancement of your look, while Face Sculpt delicately corrects facial features. PhotoWorks is also handy body slimming software. So you can use it to make your legs and arms skinnier, narrow down your waist, enhance your muscles, and much more. This way, even the dullest of your pics will look like a glossy magazine cover!
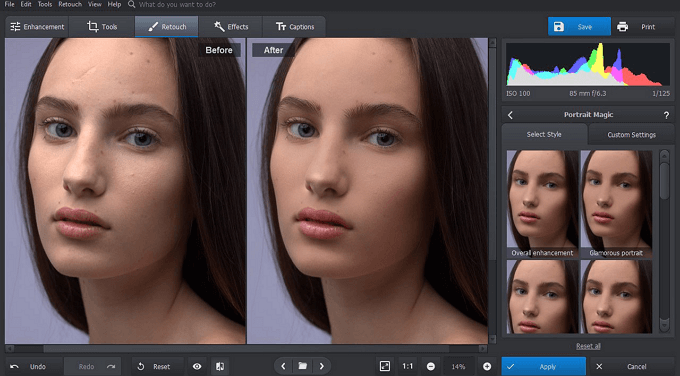
Make glamorous portraits with the help of Portrait Magic
If you are dealing with a RAW landscape, you will appreciate such tools as the Radial Filter and the Gradient Filter. The former emphasizes key objects in a pic, making them stand out and attract more attention; the latter creates a vibrant sky without affecting the lower part of a landscape. The Clone Stamp and the Healing Brush come in handy when you need to remove unwanted objects (electricity wires, litter, passers-by, shadows, etc.).
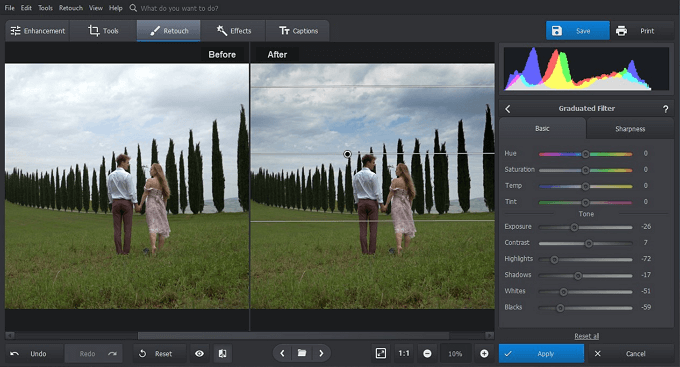
Apply the Gradient Filter to make the sky more colorful
Now you see that RAW photo editing is not so scary and complicated as it might seem. Even if you are a complete beginner, you can take advantage of the ample post-processing opportunities provided by RAW images. What's even better, you don't need to purchase Photoshop or other super expensive software: PhotoWorks is affordable, but it has everything you need to make a RAW picture look absolutely gorgeous.
Need more tips on processing RAW images? Check helpful techniques and guidelines in this detailed tutorial on CNET. Try them and see if RAW editing in other programs is as simple as in Photoworks.
By the way, PhotoWorks is a fine choice not only for beginners, but also for experienced photographers. They will definitely enjoy intelligent enhancement options, which can save hours of laborious manual retouch. Besides, even the most experienced photographers will appreciate the intuitive interface and the speed of processing.


