How to Make a Picture 2x2 and Print It Easily


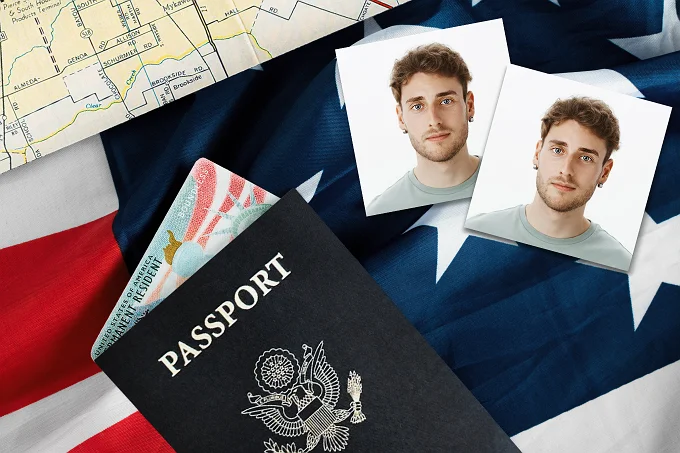
Need to print 2x2 photos for your passport or visa application? Are you currently on a tight budget or don't have spare time to visit a photo studio? Then, create ID photographs yourself! To save you the trouble, we’ve compiled a list of official requirements, prepared a step-by-step guide, and picked up intuitive software for editing ID photos. Without further ado, let’s jump right in.
Wondering how to print a 2x2 photo from your phone?
Download an all-round ID image maker below and do it in a breeze!
2x2 Photo Requirements
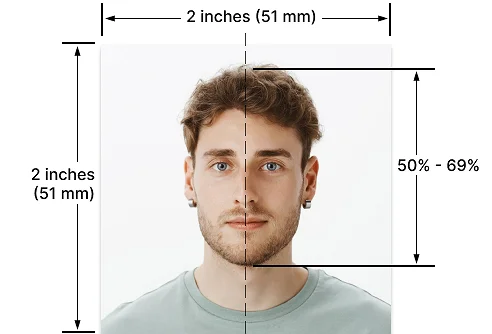
ID photo specifications vary from country to country. If you need to renew your U.S. passport or apply for an American visa, you need to submit an image in 2x2 format. There’s a rather long list of requirements for 2 by 2 photos on the government website, and here are the main ones:
- The photo must be 2x2 inches (51 x 51 mm / 600 x 600 pixels)
- Only color photographs shot within the last 6 months can be submitted
- Selfies aren’t allowed, so use a tripod or ask someone to take a photo
- The image backdrop has to be white, with no shadows or texture
- The head should be 50% to 69% of the entire picture’s height
Want to prepare 2x2 printings automatically?
Simply pick your document type and country in Passport Photo Maker!
With the software described above, you will automatically turn your regular photo into one that meets all the government guidelines. For a full list of requirements, visit the official Travel.State.Gov website.
2x2 Photo Examples with Guidelines
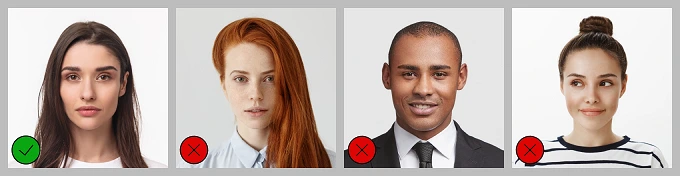
When you take your own passport photos, you should also pay attention to where your gaze is directed, what you wear, what kind of lighting is around you, etc. Check out the examples of all the dos and don'ts below to prevent the rejection of your application.
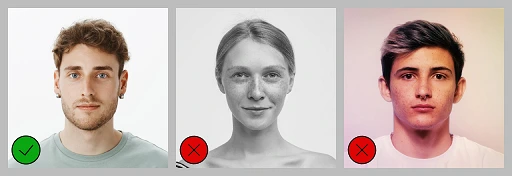
Facial Expressions
Your face should be fully visible. Your hair shouldn’t obscure your face. Maintain a neutral facial expression without a smile, scowl, or smirk. Your eyes should look straight into the camera and be wide open. You aren't allowed to use photo manipulation apps to alter your face, including getting rid of scars, wrinkles, or the red-eye effect.
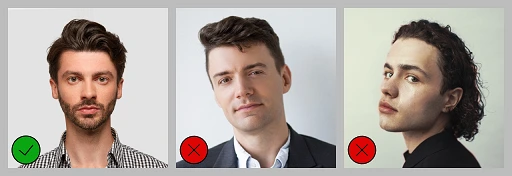
Posing
Don’t rotate & tilt your head or make any poses. Keep your head straight, directly facing the camera. Selfies are forbidden since they frequently have distortions and incorrect camera angles.
Lighting
Your image must be clear, with no shadows, and in color to reproduce your skin and eye color properly. Rather than harsh light, use a soft one to avoid making your shot underexposed or overexposed. Don’t apply any filters to your ID pictures.
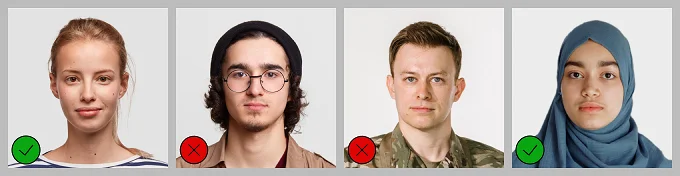
Clothing & Accessories
Avoid wearing a uniform of any type, just put on your everyday clothing. You cannot wear hats and headphones, as the hairline must be visible. The only exception is religious attire, as long as the face is fully exposed. Spectacles and sunglasses are also forbidden.
Useful Tips for Taking 2x2 Pictures
Check out these tricks to help you get great pictures on the first try and avoid rejection:
- Sit or stand 1.5 meters away from the camera.
- Ask someone to take pictures of you or use a tripod.
- Use a plain white backdrop 1 meter away behind you.
- Don’t wear light white clothes that blend with the background.
- Apply no intense and heavy makeup before the photoshoot.
- If you plan to get a face tattoo or piercing, take your picture afterward.
How to Make a 2x2 Picture: Editing and Printing
Explored all the requirements? It’s time to take some action! Download Passport Photo Maker software for Windows PCs and learn how to print passport photos with minimum effort in mere minutes. Just click the button below to get started!
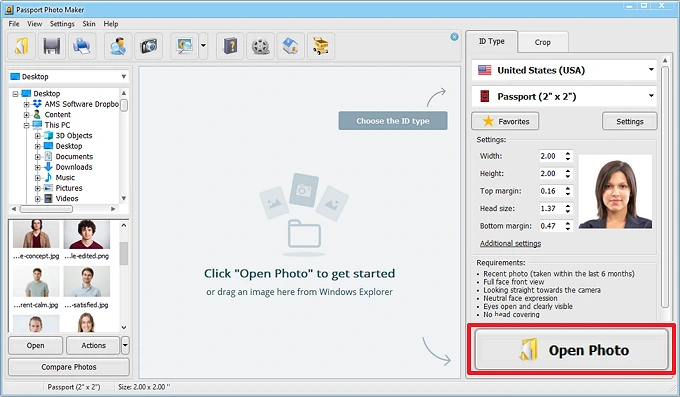
Step 1. Open Your Photograph
Run the software after installing it on your computer. Click the Open Photo button to upload the picture you’ve recently shot with your iPhone camera, or just drag and drop it into the program.
 Upload your photo into Passport Photo Maker
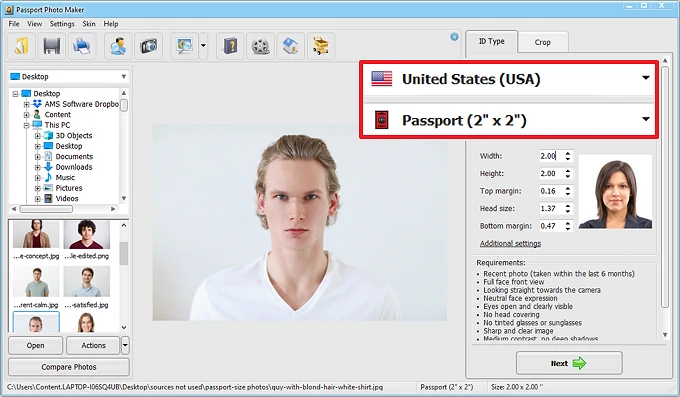
Step 2. Pick a 2x2 Template
Passport Photo Maker comes with ID picture templates for 130+ countries. You just need to select the country and necessary document type on the ID Type tab. Since we’re preparing a 2x2 image, choose the US passport or visa. On the sidebar, you can check out the latest photo requirements once again and see that the program uses the right picture height and width. Click Next.
 Choose a 2x2 passport photo print size
Step 3. Crop Your Image
Thanks to smart face detection, you don’t have to worry about your head size in relation to the entire photograph, as well as the slight tilt of your head. Just choose the center of your eyes’ pupils, the bottom of your chin, and the top of your head, and then the software will automatically crop and rotate the picture.
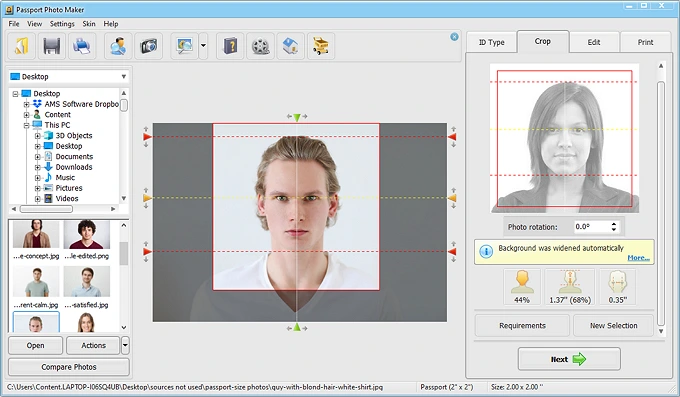 Crop your photographs in a few clicks
Step 4. Change Your Clothing or Backdrop
Switch to the Edit tab to tweak the photo a bit. Here you can replace your unsuitable clothes, such as a uniform or a white T-shirt, with something appropriate from the integrated clothing collection. You can alter the backdrop without affecting your face as well. The program also offers retouching and correction features, but be careful, as your picture should stay as natural as possible.
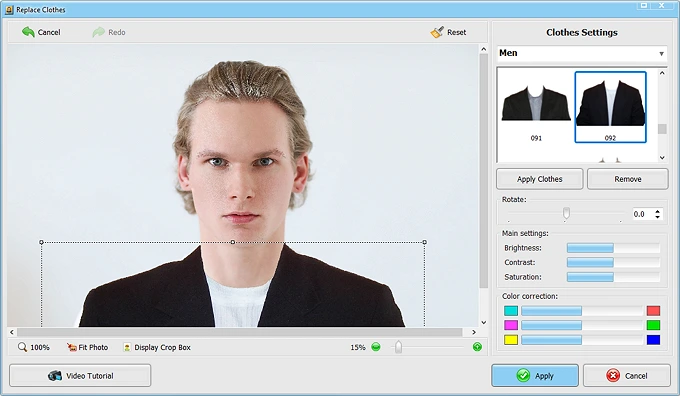 Replace your t-shirt with a suit
Step 5. Print Out Your Images
Once you’re satisfied with the result, switch to the Print tab to select the paper size and number of photocopies. Compare the required paper type with the one you put into your printer and click Print Photos. “Where can I print a 2x2 photo if I don't have a printer at home?” you may ask. Don't worry, just save it as a JPEG file on your computer, transfer it to your USB or smartphone, and go to the nearest convenience store or post office to print it out.
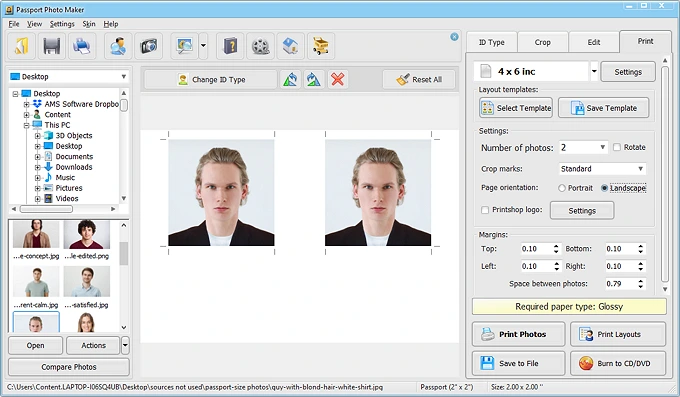 Add crop marks for easy cutting
Want to try making your own passport photo right now?
Download Passport Photo Maker and get started!
How to Make a 2x2 Picture: Complete Video Guide
Find video tutorials more helpful and easy to follow than written guides? Check out the video lesson below and learn how to create ID images according to the latest requirements and how to print passport-size photos with Passport Photo Maker.
Create DIY passport pictures hassle-free!
Just get Passport Photo Maker and follow the steps in the video.
Conclusion
Now you know how to create 2x2 photos at home with a handy Passport Photo Maker. With this tool, you can get the same results as from going to a photo studio to take your pictures. Just make sure you follow all the official requirements to get rid of fears that the ID image may be rejected. It's time for you to prepare your own photographs and go on your long-awaited trip!
FAQ
Create 2x2 images in a few simple steps with Passport Photo Maker.
Step 1. Add your picture to the program.
Step 2. Pick a passport, visa, driver's license, or firearms license template from the built-in database of 130+ countries.
Step 3. Crop your photo in a few clicks with the face-detecting tool.
Step 4. Enhance your image if needed. Alter the backdrop and clothing.
Step 5. Save your 2x2 picture as JPEG for online application or print it directly from the program.
Follow the link to find out more about how to print 2x2 photos.
Here are the main requirements for 2x2 photos that must be met in order not to get a rejection by the authorities:
1. An image must be in color and taken in the last 6 months.
2. White backdrop without any texture or shadow.
3. The face is fully visible and has a neutral expression.
4. Eyes are open and looking straight towards the camera.
5. No spectacles & sunglasses, head coverings, or headphones.
Follow the link to check out the full list of requirements with image examples.
Add your picture to the Microsoft Word document. Click on the image to make it active. Go to the Format tab under Picture Tools and do a square cropping of the photo. Then, adjust the measurements of height and width by entering 2”x2” into the same-name boxes in the Size section.
The 2x2 measurement means that the height and width of the image should be 2x2 inches, 600x600 pixels, or 51x51 mm.
To convert 2x2 images to PDF format, you can open Adobe Acrobat online or use the default Photos or Preview apps on Windows PCs and Macs, respectively.
You can create a 2x2 passport photo with the Passport Photo & ID Maker app for iPhone, an analog of Passport Photo Maker for Windows. Here’s how:
1. Download the app from the App Store.
2. Choose the country and ID type.
3. Take a picture directly in the app or upload a pre-made one from the gallery.
4. Crop your image with the help of a cropping layout.
5. Edit your photo if needed. You can replace clothes, modify the background, and improve brightness, contrast, white balance, and saturation.
6. Pick the paper format. Save, print, or share your ID image.