How to Crop Headshots: Ratios, Rules & FAQ
 5
Votes: 1
(Rated: )
5
Votes: 1
(Rated: )
A headshot is a photo of someone's head and shoulders. Unlike actor headshots, which must be 8x10 inches, business shots and most other portraits of this type don't have any particular size specifications unless they are for an ID.
No matter the reason you need a headshot, we will teach you how to create one from an ordinary photo. This will save you a lot of time and the necessity of scheduling an extra photoshoot. In this tutorial, we'll demonstrate how to crop headshots on your PC quickly and effortlessly without complicated and demanding gear like Photoshop. For the task, we'll be using PhotoWorks, a comprehensive yet user-friendly image editing software. You’ll also learn some helpful tips to change the impression your image sets on the viewer. So, let’s dive right in!
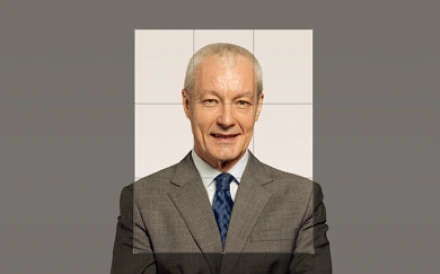
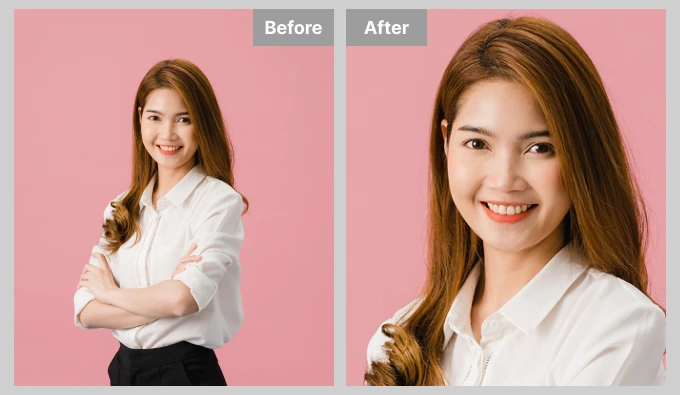 Turn an ordinary photo into a standard business headshot
Want to achieve the same result in photo cropping? Click the button belowand download an easy-to-use image cropper with lots of picture editing features!
Reasons to Crop a Headshot
Before we go through the secrets of a proper headshot crop, let's have a look at the benefits of turning a regular photo into a head and shoulders picture:
- Helps better emphasize the main subject
- Allows to remove any distracting elements
- Boost the overall composition of a pic
- Provides closer insight into the subject’s emotions
- Helps modify the dimension and aspect ratio
Check out the examples below to dive into deeper detail and visualize the mentioned effects.
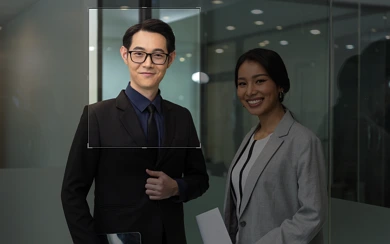
Set the Focus on the Principal Subject
Turn your full-size photos into head portraits with the help of a cropper. It's an efficient technique to draw the attention of viewers to the primary object in the image. You can even perform this trick over a group picture of you and your friends to transform it into a neat headshot.
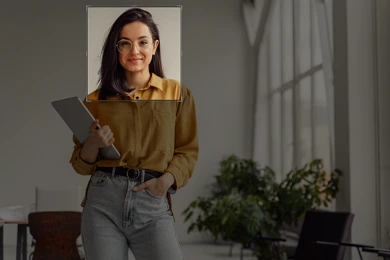
Remove Any Distracting Elements
Have you snapped your portrait at home or in a crowded place and noticed foreign objects and bystanders in the background when it was too late for a reshoot? Odd objects can make the picture look cluttered or less professional. Fortunately, you can remove restless pets, impatient strangers, or ubiquitous plants from the frame simply by turning your original image into a headshot-size photo.

Boost the Overall Composition
Realized that your photo is too empty and tedious because there is too much air? Or do you have a detailed background that consumes your central object and makes the overall composition look too heavy for the viewer's eyes? Don’t despair! In such cases, turning your picture into a head and shoulders photo would save the day. All you have to do is zoom in and crop.
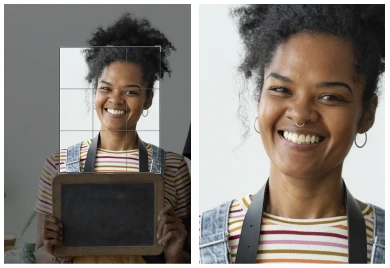
Reveal the Subject’s Emotions
The subject's eyes and overall facial expression have the biggest emotional impact on viewers. If you crop your headshot properly, you can emphasize those emotions. Happiness, surprise, sadness, and even anger - all will appear in a new, mesmerizing light. However, headshots might also expose the model’s flaws, like uneven skin tone, acne, or scars. You can fix that in an easy-to-use photo editor.
Modify Dimensions and Aspect Ratio
Cropping a picture is the most effective way to transform it from landscape to portrait orientation. Pick the desired headshot dimensions and aspect ratio in the photo editing software to optimize your pic for different platforms and prepare it for printing or uploading to your profile.
Cropping is a simple yet effective editing strategy to make your portraits look more expressive. However, if you don't know how to crop a headshot properly, you might completely damage its composition and visual impact. To avoid that, we're going to explore the standard sizes of head and shoulders photos and go over the essential tips for cropping images of this type below.
Standard Headshot Sizes
How big should a headshot be? Let’s define it! Casting headshots must be 8" x 10" when printed. ID passport photos have different size standards, depending on the country and ID type. For instance, Spanish passports and Colombian visas require 3" x 4" headshots. Meanwhile, photos for Argentinian, Indian, and Syrian passports have to have 4'' x 4'' dimensions. For social media and blogs, you can choose headshot aspect ratios depending on the platform. Facebook or Twitter, for example, have a circular profile icon, so your profile picture should preferably be a 1" x 1" square.
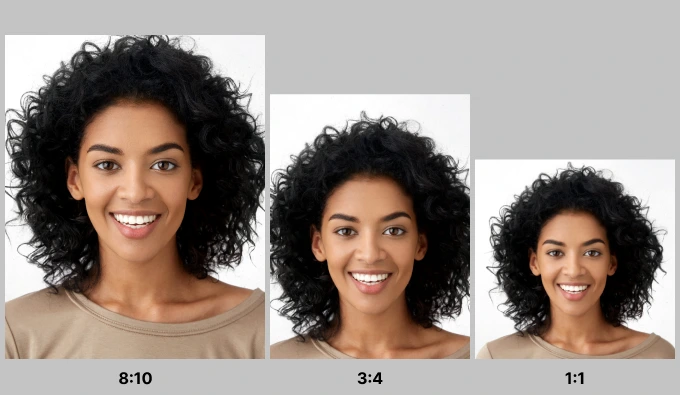 Headshot samples of the 3 most popular ratios
Headshot Cropping Rules
We've gone over the main reasons to create headshots and their size requirements. Now let's have a look at the key rules for cropping photos of this type, so you don't make any critical mistakes when you move on to practice.
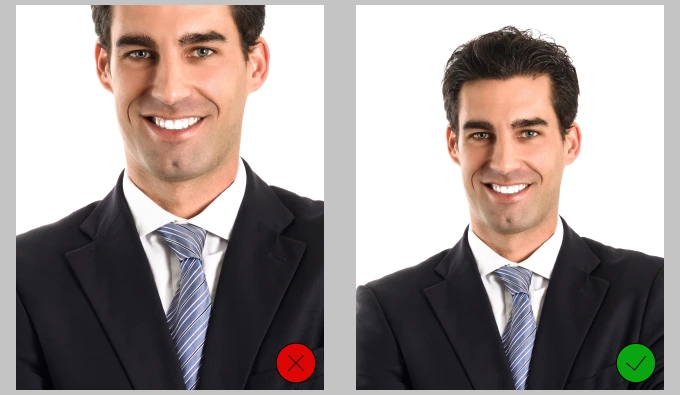
Avoid Cropping Too Low or Too High
The optimal place for cropping is usually about above the chest of the model. Crop the headshot of a man, for example, right above where the tie meets the jacket. Talking about the upper part of the photo, leave some space above the head or crop it up to the forehead to create a close-up. But don’t chop the very top of the head off. That will look like a photography mistake.
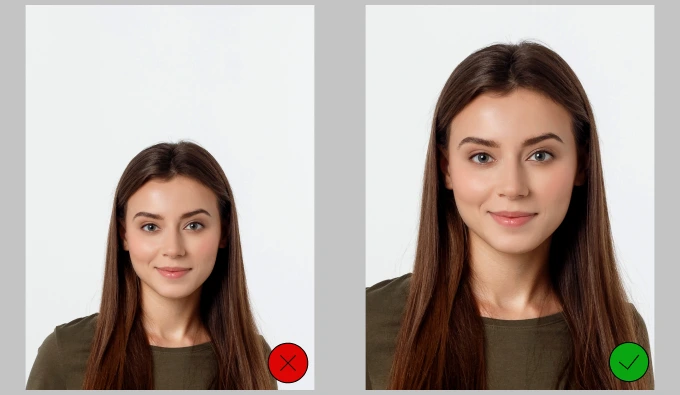
Shift Focus to the Model’s Face
Avoid having too much air above the model’s head or too much of their body in the frame related to their face. Use the cropper and make your face, body, and background each occupy roughly one-third of the space. Also, remember that it’s crucial to capture the model’s eyes - make sure they are in focus.
Want your photo to look its best? Perform portrait retouching in PhotoWorks: get rid of acne scars, change skin tone, whiten teeth, apply digital makeup, or edit a smile in your picture.
How to Crop Portraits
You've learned the fundamentals of photo framing, and now it's time to practice. If you follow the instructions for cropping headshots below, you'll be able to turn regular photos into head portraits with PhotoWorks quickly and easily. Let's move on to the tutorial.
Step 1: Install PhotoWorks on Your PC
To begin, click the orange button below and download the editor’s installation package. As soon as you do that, open the file and follow the guidance of the installation wizard to launch the editor.
Step 2: Upload the Photo You Want to Crop
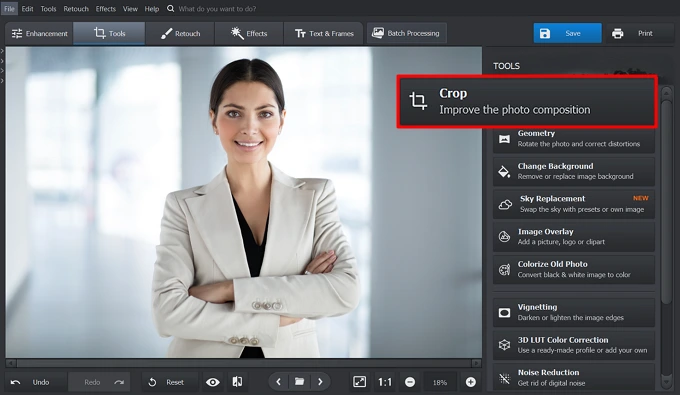
Open your picture in the editing software simply by clicking the Open Photo button and selecting an image from your PC library. Alternatively, drag and drop your picture into the program window. Then go to the Tools tab and choose the Crop tool.
 Open the original photo in the program
Step 3: Pick the Appropriate Grid
PhotoWorks comes with various grid overlays to help you fix the geometry and proportions of your image and make it more engaging. You can find them in the Grid Overlay dropdown menu inside the Crop tool. Check out more info about each of the four popular grid overlays below.
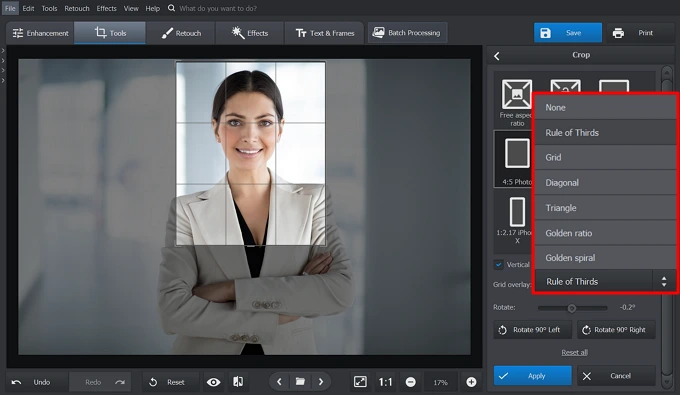 Fix the composition of your headshot with the Rule of Thirds grid
Golden Ratio
This overlay's central lines are closer to one another for you to place your subject in the middle. As a result, the composition of your head portrait will look more put-together and balanced. Besides, you will immediately focus the viewer's attention on the principal subject.
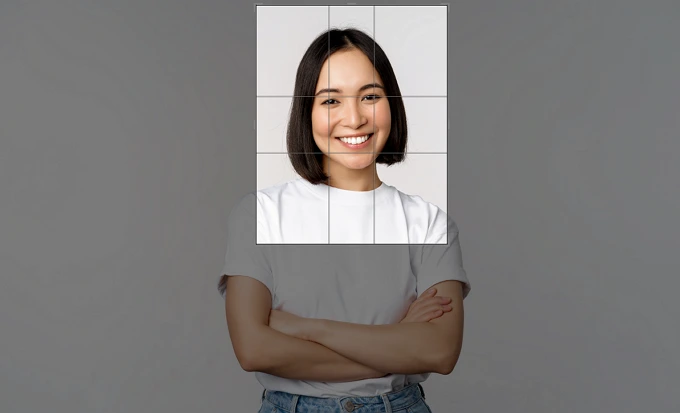
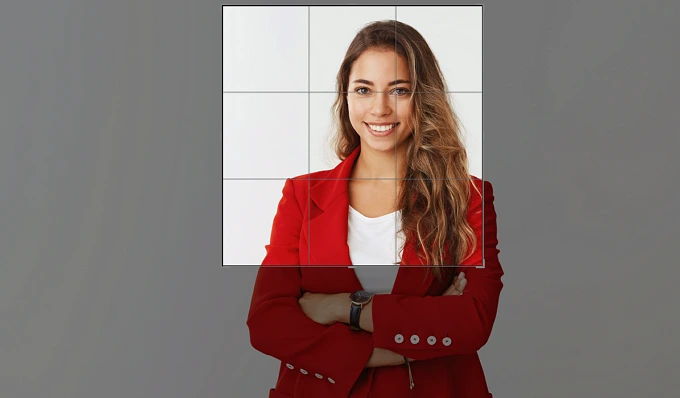
Rule of Thirds
The Rule of Thirds overlay divides your image into nine equal parts based on the human perception of an image. Our eyes are naturally drawn to one of the intersection points of the grid rather than the center of the frame. Therefore, the main idea of this grid is to have your objects or people in a spot where the grid lines intersect. Crop your headshot that way, and you will achieve a harmonious-looking photo.
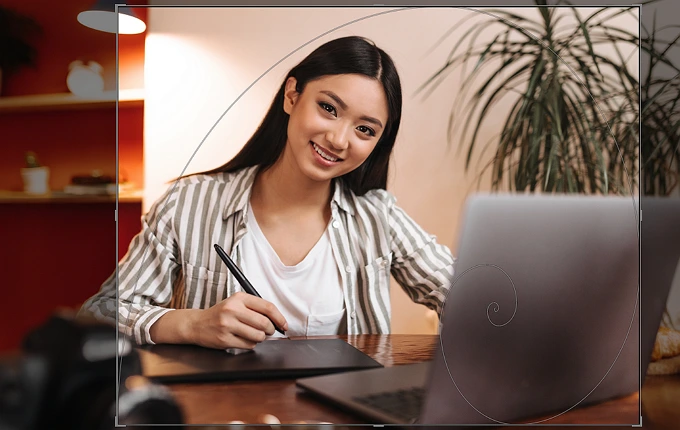
Golden Spiral
This grid overlay, also known as the Fibonacci Spiral, aids you in creating a captivating composition. When you use the Golden Spiral, you lead the viewer's gaze from the end of the spiral inward. This technique is not suitable for cropping all headshots. It works well with profile photos where the model isn't directly facing the camera or with portraits where the model has her arms in the frame. It's a great idea to use this grid over creative photographs for your modeling portfolio or social media.
Diagonal
Diagonal lines of this overlay lend dynamics to your image, giving the observer the feeling that the picture is moving. This allows you to drag the viewer’s attention through the entire image and make them examine it for longer. Just like the Golden Spiral, the Diagonal preset is not appropriate for business headshots and actor photos of this type. It works well with portraits where the model is angling to the side or leaning on her arm.
Step 4: Choose a Preset
After you've chosen a grid, tick the Vertical aspect ratio checkbox and pick the necessary preset from the in-program library: 4:5 Photo, 1:1 Square, etc. Alternatively, customize the proportions as you wish. To do this, scroll down to Custom Proportions and type in the desired dimensions.
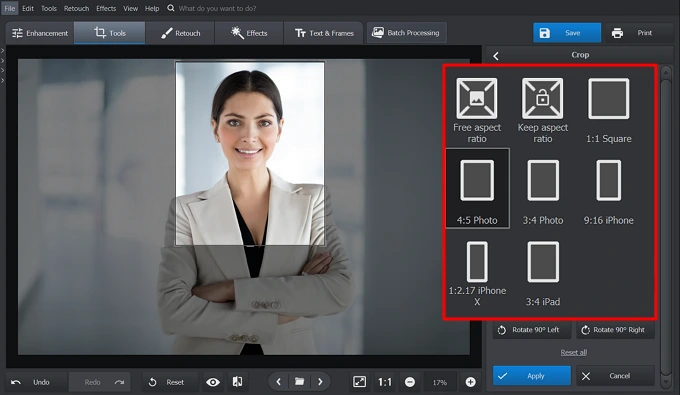 Crop your image in preview mode with the 4:5 Photo preset
Step 5: Download Your Headshot
If you are happy with the results you’ve achieved with the cropper, click the Apply button. Want to improve your photography a bit more? Use PhotoWorks to color-correct your photo, apply one-click filters, retouch the model’s skin, or add embellishments. Now download the cropped head portrait by clicking the Save button.
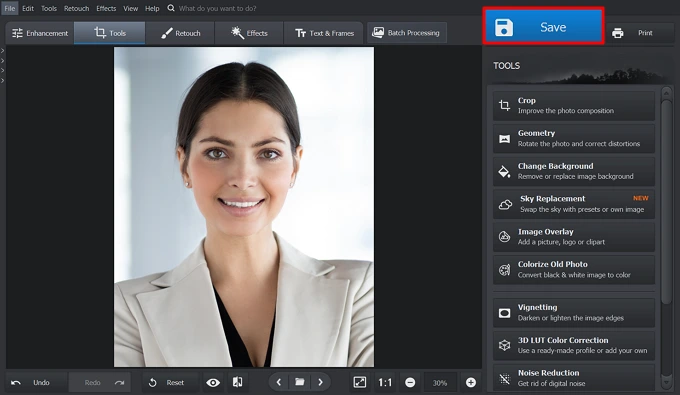 Save the portrait you've just created
Cropping FAQ for Headshots and Portraits
1. What is the crop ratio for headshots?
There are no specific requirements on proportions for artistic and business head and shoulders photos. However, an actor’s headshot ratio should be 4:5 (8′′ x 10′′). Because of these auditions’ standards, such proportions have become popular in this type of photography. If you need a head and shoulders image for your credentials, ratio requirements will depend on the country you are visiting and the ID type you are applying for. Check out the officials’ website to note all the specifications.
2. What programs should you use to crop?
If you have a Windows PC, use PhotoWorks, an AI-run photo editing software. The program will help you make headshot-size photos from ordinary pictures in seconds. If you are a Mac user, try the default Preview+ option to crop your images. This built-in feature allows you to edit pictures directly in viewing mode.
3. What are the specific features of business headshots?
- More air in the frame. Photographers usually shoot business headshots against a simple and neutral background. This adds more air to the image and gives it a more presentable look.
- No required standard size. There are no dimension requirements for business headshots, and the format depends on the platform you will upload them to.
- Focus on the human gaze. The person's eyes are the key thing in a business portrait, so they should be as clear as possible. If there are any issues like the red eyes effect, you can always fix them with a handy picture editor.
4. Where to use my headshots?
- LinkedIn. A professional head and shoulders image on this platform can help you make a positive impression on a recruiter, casting manager, HR officer, or prospective employer. The standard headshot size for LinkedIn is 400 x 400 pixels.
- Instagram. It’s a platform for entertainment, so you can choose a more chilled-out photo. The profile headshot for Instagram must be at least 240 × 240 pixels.
- Facebook. It’s a rather formal platform designed for communication. Many employers use it to reach out to their prospective employees. That's why you should choose photos that are more discreet and keep your page uniform. For Facebook, the minimum recommended headshot dimension is 170 × 170 pixels.
- Twitter. This is a micro-blogging platform, so your photo should reflect the theme of your blog or your interests. The recommended headshot photo size is 400 × 400 pixels.
- Gmail. It’s easier to navigate emails if contacts have a profile picture. Plus, your emails are less likely to get lost in the recipients' mailboxes, and you'll get your response sooner. The vibe of your photo for this platform should match the purposes you use your email for: business conversations, correspondence with university professors, communication with friends, etc. The required digital image size is a minimum of 180 x 180 pixels.
- Application for an ID. Headshot photo size requirements for credentials depend on the type of ID (passport, driving license, visa, etc.) you need it for. Check out what size headshots should be for your ID application on the website of the country's officials.
Final Thoughts
If you've read our guide up to the end, you are familiar with the rules for cropping headshots and their size and composition requirements. Plus, you've seen how to crop photos of this type with PhotoWorks. This powerful yet uncomplicated program will help you effortlessly turn your photos into headshots and polish them - mask skin flaws (pimples, red eyes, scars, etc.), perform color correction, change their backdrop, and much more. Hopefully, you will enjoy using the software to crop your portrait and have wonderful post-production.
Do it in an automatic photo editor. Try for FREE!