Easiest Ways to Make a Reaction Video for YouTube


 5.0
Votes: 3
(Rated: )
Want to take up video blogging but don’t know where to start? Then you should give reaction videos a try! They are some of the most popular videos on YouTube and TikTok and can help you drive traffic to your page, attract a new audience, and get extra views for your channel. This leading genre of entertainment content is not going anywhere anytime soon, and, just between us, creating them is so much fun! So why not take advantage of it and attract new subscribers?
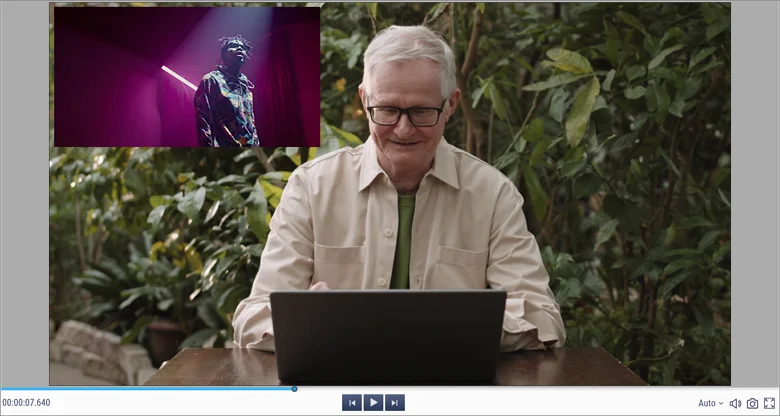
There are many hidden pitfalls in the video production process, so we decided to walk you through it. In this article, we’re going to talk about how to film reaction videos and how to edit them on a smartphone and PC. Along with the instructions, we’ll also share a few useful tips to help you with video production. Now let’s get rolling!
What is a Reaction Video?
Reaction videos have taken over YouTube and dominate every corner of popular social media platforms. A reaction video refers to a video showing a person’s reaction to something, usually a TV show, music video, TikTok hacks, or basically anything. In such videos, bloggers and experts often share their opinion and give recommendations.
There is actually a big variety of reaction videos. They typically display the reaction of a single host, but sometimes several participants are invited, so a viewer can watch the reaction of the whole group. Besides, the host can record their own reaction or invite a guest to record theirs instead - kids, friends, experts, influencers, etc.
What are the Benefits of This Kind of Content?
Firstly, reaction videos are the secret sauce of audience growth and traffic boost. Secondly, the video production process is quicker as it doesn’t require any time-consuming script writing or planning. Finally, this content may be incorporated into many brand strategies.
How to Record Reaction Videos - Useful Tips
Now that you know what is considered a reaction video, it’s time to figure out what makes a good reaction video. Even though they are often referred to as low effort content, there are still some difficulties you might face while producing them. This is why we decided to share a few suggestions to make the creative process smoother for you. Here are 5 top tips for how to create reaction videos:

- Improve lighting. It might be dark indoors, so make sure to set up lighting properly and order special lighting equipment if necessary.
- Consider the quality. Your video has to be visually appealing, so it’s important to record it in HD quality. To do so, use a decent camera and a tripod to avoid camera shakes.
- Find a good microphone. Poor sound quality is a big turnoff for a viewer, so don’t use laptop or phone mics. Instead, get yourself a device that guarantees you a crisp and clear sound - people often scream or laugh loudly in reaction videos, and some mics are too weak for it.
- Record genuine reactions. Don’t be shy to open up and show your real emotions - nobody is going to watch you quietly watching a video. Remember, the content has to feel relatable to attract the audience.
- React to something unseen. Ensure that your guest and you haven’t seen the video you’re going to record a reaction to. Otherwise, the reaction is not going to look genuine.
Feeling inspired, but can’t decide on the idea of your video? No problem - here are a few popular ideas that will work out for almost anyone. So, in your videos, you can record yourself or other people reacting to:
- a recent social media challenge,
- comments of your audience,
- hits from other generations,
- a new TV show or movie,
- other 'React To' videos,
- your old videos.
How to Make YouTube Reaction Videos on PC
As you know now, producing reaction videos is not that difficult, but you need to arm yourself with a program featuring a Picture-in-Picture tool. Then the video overlapping process will be very simple - add one to your footage and adjust the layer to your liking: opacity, volume, and other settings.
On a Windows computer, you can use Clipify, a beginner-friendly video editor. Along with the Picture-in-Picture tool, you’ll have a great number of editing features at your disposal to create an engaging reaction video: Chroma Key tool, color correcting Curves, pan & zoom effects, and a huge collection of transitions, titles, and filters. Now it’s time to find out how to make YouTube reaction videos with Clipify - just follow these simple steps:
Step 1. Install Clipify on Your Computer
First, download the installer by hitting this button and open the file. Then run the installed software.
Step 2. Add Your Footage
To import the video clips with your reaction, hit Add Videos and Photos and select the files you're going to use in this project.
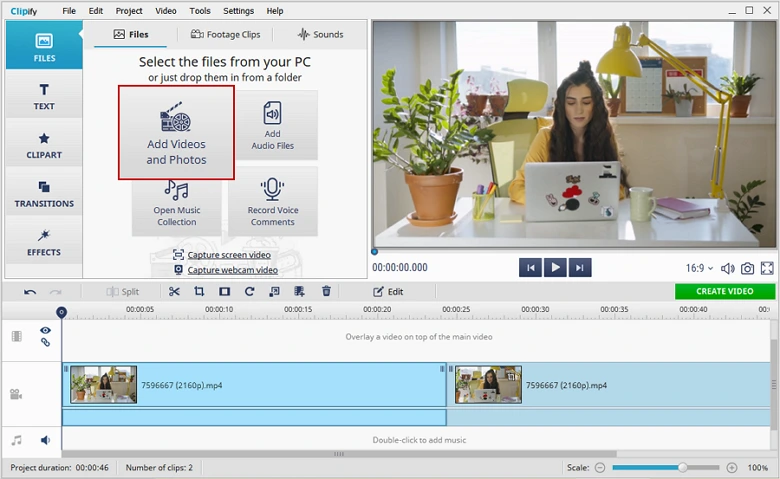
Upload the footage with your reaction
Step 3. Overlay the Video
Add the video you’re reacting to by picking the Overlay tool and choosing the clip. Once it’s put on top of the main video, you can make other adjustments - add animation effects, reposition the video box, or change its opacity and sound volume.
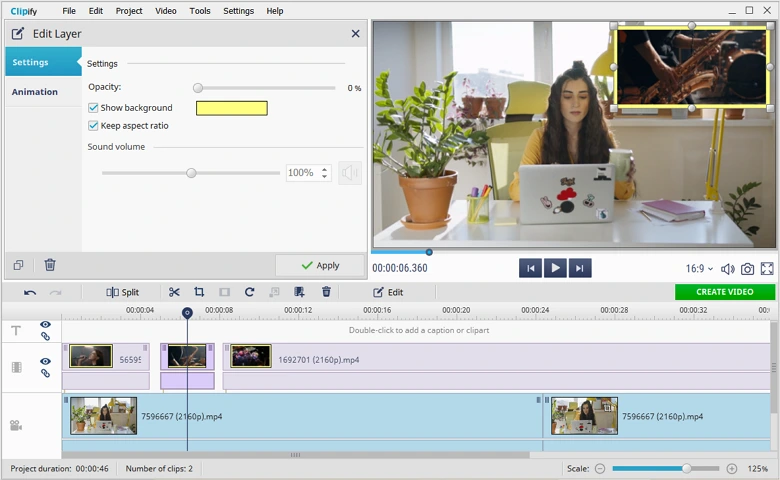
Find a proper placement for the new layer
It's common practice to put the video you’re reacting to in the bottom-right or bottom-left corner of the screen. We also recommend aligning it with your gaze if possible - for example, you can film yourself looking slightly to the left or right.
Step 4. Export the New Video
Click on the Create Video button and choose the file format you need. If you’re going to upload the reaction video to YouTube, hit Create Video for the Internet, select YouTube, and choose the video quality you want, from 240p to HD 1080p. There are also options for Instagram, Facebook, Vimeo, and other common formats like DVD, AVI, etc.
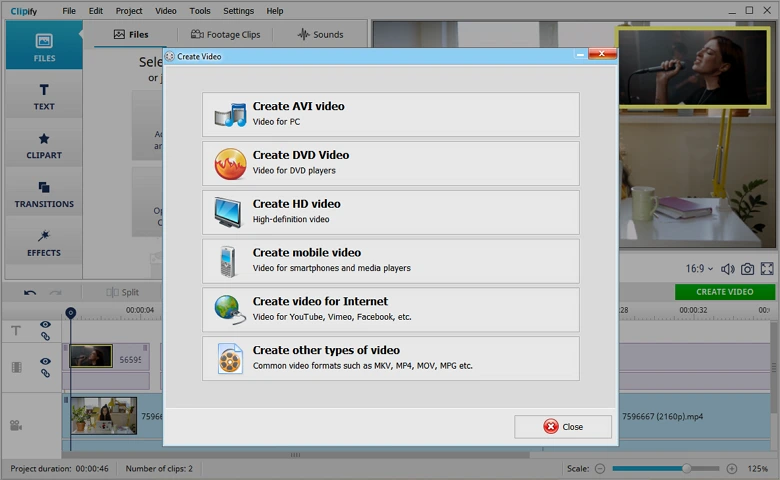
Save the edited reaction video in high resolution
Want to edit your webcam reactions like a pro?
Use Clipify to put your logo, add 200+ free soundtracks, and more!
How to Edit Reaction Videos in a Mobile App
To edit your content on a smartphone, you can try CapCut, a video editing app that is available in the App Store and Google Play. It lets you easily split clips, add music and effects, change the aspect ratio, apply filters, and even reshape facial features in your footage. The app also offers a Picture-in-Picture feature that will come in handy when creating a reaction video.
The free version leaves the program’s watermark at the end of an edited video. Another disadvantage is that the CapCut takes up too much space - 1 GB. If you don’t mind these downsides of the app, then let’s see how to make a reaction video on YouTube using a smartphone:
- Open your video. Start a new project and select the main video with your reaction.
- Overlay the second video. Tap on the plus icon on the footage that you’ve added to the timeline to select the other video from the gallery. Then tap on one of the clips and hit Overlay - adjust the placement of the overlapped video on the preview panel.
- Save the new video file. Open the export settings by tapping 1080p on the top of the screen - choose the desired resolution and frame rate. Then hit the export button to save the new video on your device and share it directly on TikTok, Instagram, WhatsApp, or Facebook.
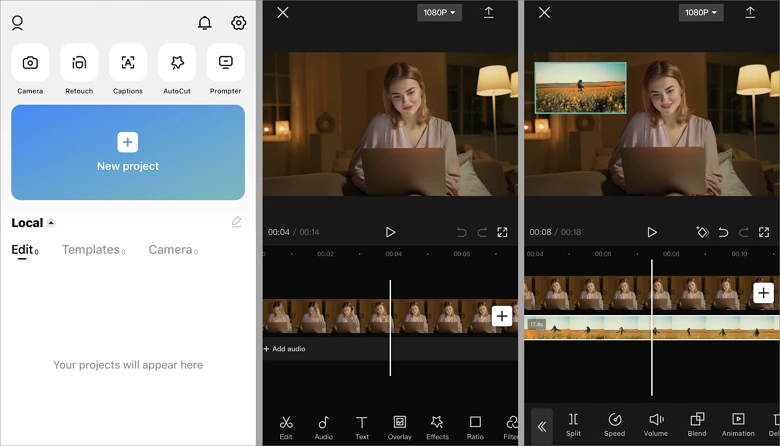
CapCut, a mobile app for creating reaction videos in a few taps
Are Reaction Videos Legal?
All in all, uploading a reaction video to the Internet is legal. However, you can’t avoid using someone else’s content when creating them, and that can result in receiving a copyright strike. Then your YouTube video might be taken down or demonetized. So, how do you make reaction videos on YouTube legally? Let’s find out more about it below.
How Do You Make Reaction Videos on YouTube Legally
There are a few things you can do to post your content online without breaching copyright laws. To save your creative ideas from such a grim fate, make sure to get consent from the owner before publishing your reaction video. While some creators are quite easy to reach out to, contacting others might be difficult or even impossible if you’re recording a reaction to a popular video. That is why it’s better to keep this issue in mind before choosing a video to react to.
So, how to make reaction videos on YouTube without copyright infringement when you cannot get the official permission of the video owner? In such a situation, correctly attributing the original video in the description box is the best thing you can do to get away with the YouTube reaction video rules. Crediting the channel and video will at least minimize the risk of getting a copyright claim.
If you already received a claim, you can try appealing reaction video copyright strikes using YouTube’s Copyright Management tool.
Wrapping Up
So, you’ve learned how to do a reaction video of top-notch quality without getting a copyright claim on YouTube. Though there are countless ways to create this kind of video content, we recommend you get started with Clipify as it’s incredibly easy to use and is full-packed with all the essential tools for producing high-quality reaction videos.
We hope this guide gave you some insights into how to start a reaction channel that will go viral - look through it one more time and put the tips into practice today!
FAQ
Filming reaction videos is quite simple, but there are several aspects you need to consider. This is what makes a good reaction video: authenticity, unpredictability, and high quality. Find more tips on how to record reaction videos.
Yes, but you need to get the owner’s permission before publishing a reaction video on YouTube.
On TikTok, you can only react to videos that are 15 seconds long or less, but it’s still an extremely popular genre on this platform. This is how you make reaction videos in the TikTok app:
1. Open the video you want to react to.
2. Choose React in the Share menu.
3. Record your reaction.
4. Tap on the video if you need to pause the recording session.
5. Position the resized video clip on the screen.
You can make reaction videos using:
1. Clipify,
2. CapCut,
3. HitFilm,
4. iMovie.
Use Clipify to enhance your content in a few clicks!
