How to Make a Passport Photo at Home


Need a passport photo, but don’t want to go to a crowded photo center? Then read this guide and learn how to take your own passport photo without leaving the comfort of your home. You'll discover a list of specifications that your image has to meet: dimensions, quality, facial expression, and so on. There are also a handful of tips to help you prepare and print a perfect biometric photo.
In this guide, we’ll also show you how to convert a photo into passport size by cropping and printing it out using Passport Photo Maker, a Windows program for preparing ID photos. It offers a database with photo templates for over 130 countries and print layouts to help you make a passport photo in a matter of seconds. Now let’s begin!
U.S. Passport Photo Requirements
To take your picture at home, you should know the current photo specifications, so you don’t have to resubmit it at the last minute. Here’s a checklist of the main American passport photo requirements your picture has to meet:
- Your photo must be no older than 6 months
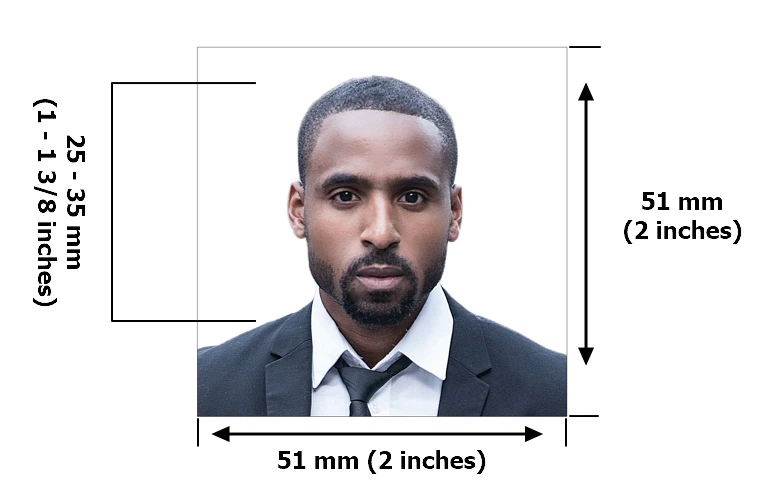
- The photo size is 51x51 mm (2x2 inches)
- The distance between the top of the head and the bottom of
the chin should be between 25 mm and 35 mm (1-1,38 inches) - The picture must be high-res with no visible pixels
- The background has to be white or off-white
- There shouldn’t be any shadows on the face or background
- Black-and-white images are not allowed
- Your face should be neutral, a wide smile is not acceptable
- Glasses are not allowed - eyes have to be clearly visible
Find more technical specifications and photo examples in the official list of requirements.
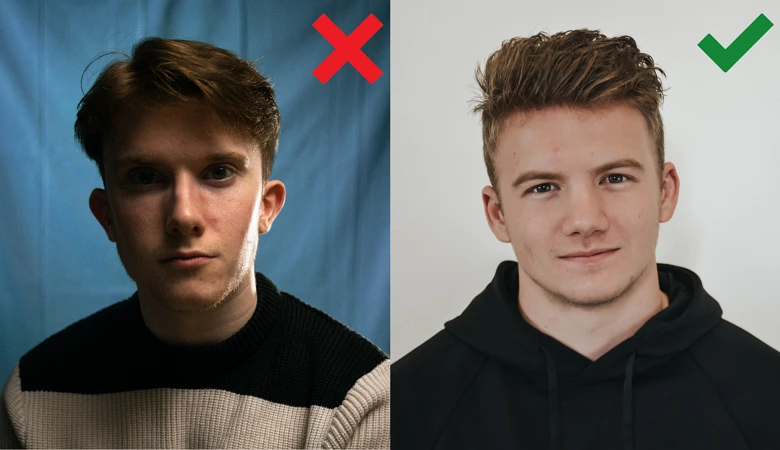
 Here’s an example of an acceptable U.S. passport photo
Want to create photos that meet all current specs?
Just upload a pic to Passport Photo Maker and use an ID template
How to Take a Passport Photo at Home
With the development of technology, taking high-quality photos has become accessible and incredibly simple. You can take a profile picture even using your mobile phone. So why not take advantage of it? Here’s how to take your own passport photo:
Step 1. Find a Suitable Background
The background of your picture needs to be neutral and white. When shooting at home, you can take your photo in front of a white wall or use a white bedsheet.

Step 2. Use Proper Lighting
You can take advantage of the natural lighting - it provides softer light in pics than lamps. If it's too dark indoors, you can use a flash to avoid shadows on your face and behind your head.
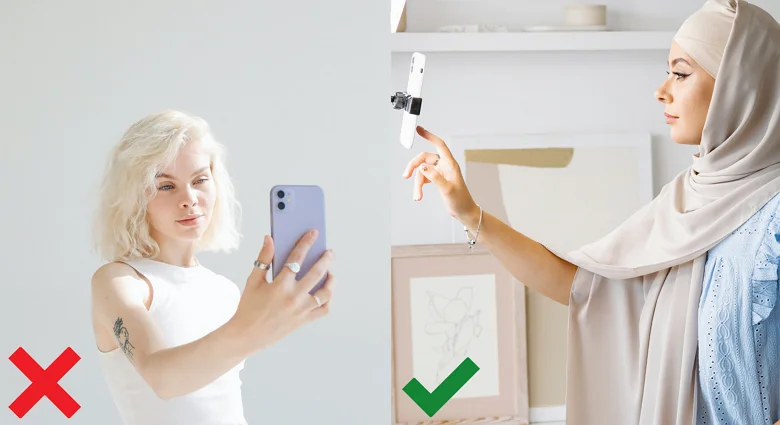
Step 3. Keep a Distance
You should not be too close to the camera - the optimal distance is 40-50 cm. Selfies are not allowed, so you’ll need to use a tripod to take a picture on your smartphone. Alternatively, you can take a passport photo with a DIY stand - put the camera on a desk, a chair, or a ladder to keep it at eye level. Don’t use any digital zoom, as it usually results in quality loss.
 Set a timer and stand a few feet away from the camera
How to Crop a Passport Photo Correctly
Already have a photo at hand but need to edit it according to the rules? You will need a tool to turn a regular picture into an ID photo. One of the programs you can use is Passport Photo Maker, software with a collection of ID photo templates for 130+ countries and convenient print layouts for quick passport photo printing. The program automatically detects the biometric features of a person and crops the picture according to the regularly updated requirements.
Now let’s equip you with the tool and get started with the editing - hit this button to download and install Passport Photo Maker on your PC.
Step 1. Import Your Picture to the PC
Save a copy of the photo on your computer’s hard drive. If you take the passport photo with an iPhone, don’t send it using messengers like WhatsApp - the quality of your picture might get worse.
Step 2. Open the Photo in the Program
Once you have the image on your PC, launch the software and navigate to your picture through the file browser on the left side of the screen or by clicking Open Photo. You can also open your digital picture by dragging the file to the startup screen.
 Upload and open your ID photo without quality loss
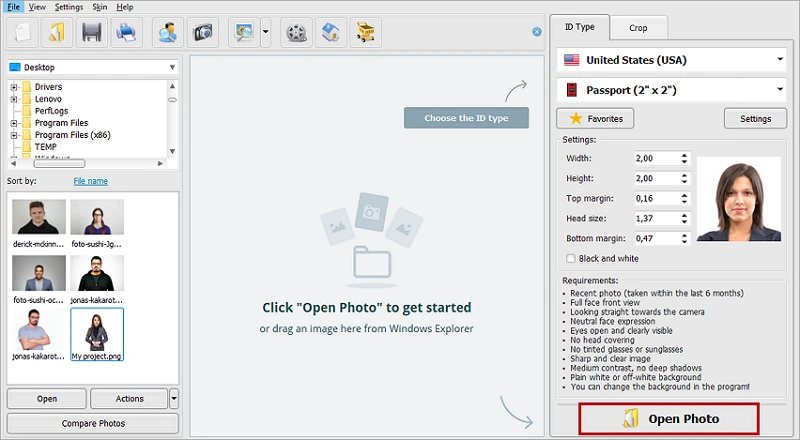
Step 3. Select the Document Type
In the right panel, you need to choose the USA in the country dropdown menu and select Passport (2” x 2”) as an ID type.
 Select the passport photo template
Step 4. Crop the Image
The program automatically widens the background and crops the picture to make the photo dimensions match the 2 x 2 proportion, but you can manually fit it by moving the lines if necessary. Then click Next.
 Resize the image according to the rules
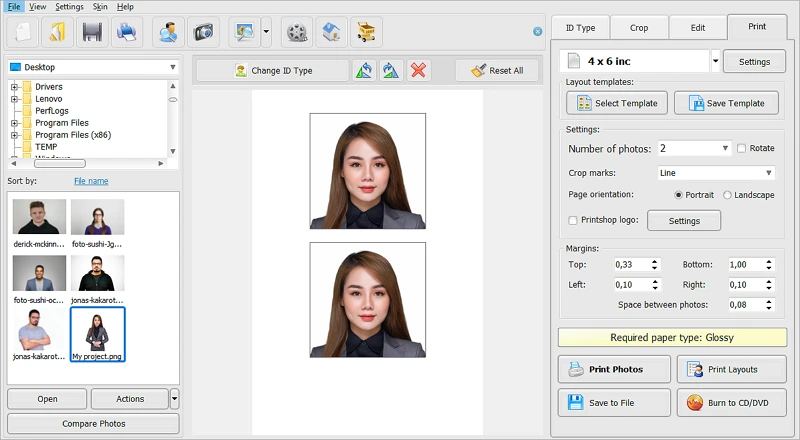
Step 5. Print the Picture
In the Print tab, select the paper size - choose either 4 x 6 inches or Letter if you need more than 2 copies. When you’re done with the layout adjustments, hit Print Photos.
 Print out your new photo
Want to create a DIY passport photo?
Prepare an ID picture on your own with Passport Photo Maker!
How to Print a Passport Photo at Home
Now you know how to take ID photos on your own. But when it comes to printing pictures, there are other intricacies to consider - you have to use special paper, print them in good quality, avoid damage, etc. That is why applicants tend to use paid services to get it done.
In fact, printing ID pictures is not that difficult, and you can definitely prepare yours using the printer you have at your disposal. Here are a few tips to help you print passport photos at home:
- Print your photo on matte or glossy paper
- Use a printer that works with photo paper
- Choose a printer of a trusted brand, such as HP, Canon, or Brother
- Print passport pictures on a printer that supports at least 300 dpi
- Cut the printed images with a guillotine paper cutter if you have one
- Measure photos with a ruler to ensure the size is right
Summary
In this article, we’ve discussed the U.S. passport photo requirements and shared a bunch of useful tips to help you take, crop, and print an acceptable picture. In addition, we have walked you through the entire process of preparing an ID photo using an intuitive program - Passport Photo Maker.
Now that you know how to print passport photos with minimum cost and effort, you don’t have to waste your time and money anymore. So don’t leave it until the last minute - set up the lighting, freshen up, take a picture, and print it out with the help of the program right now.
Can you take a passport photo at home?
Sure! Prepare it in an instant with Passport Photo Maker!
Frequently Asked Questions
Follow these steps to print an acceptable 2x2 photo:
1. Take a photo that complies with the passport photo requirements.
2. Upload the file to your computer and resize the picture.
3. Print your passport-size photographs, using a ready-to-use print layout.
Yes, this is what you need for printing out passport photos: a reliable printer supporting photo paper and 300 dpi or higher, matte or glossy paper, and a guillotine paper cutter. But there are several requirements for printed ID photos. Find more information on how to print a passport size photo.
Once you make the photo for the passport fit the required dimensions, load 4 x 6 inch photo paper in the photo tray of your HP printer. Select your photo and choose the number of copies by touching the up arrow. Then touch Done to start printing.
You need to take a compliant photo and adjust the print layout on your computer. You can do it manually or by choosing a built-in template in a program, such as Passport Photo Maker. Make sure to use photo-quality paper, either glossy or matte.
Learn more about how to take a passport photo at home and print it on your printer